DIY Anodising
When I was building my GP Replica bike, I needed some small parts anodised so started hunting around.
I found some informative websites on the subject and decided to give it a go.
I found some informative websites on the subject and decided to give it a go.
What you need:
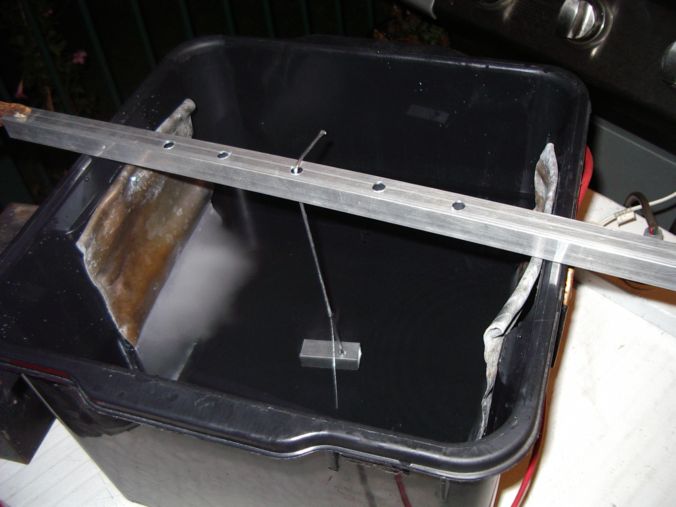
Two Plastic Tubs
One of them I drilled a hole in opposite sides and bolted two pieces of lead strip connected together around the outside of the tub by a piece of wire.
Lead flashing for roofing works fine.
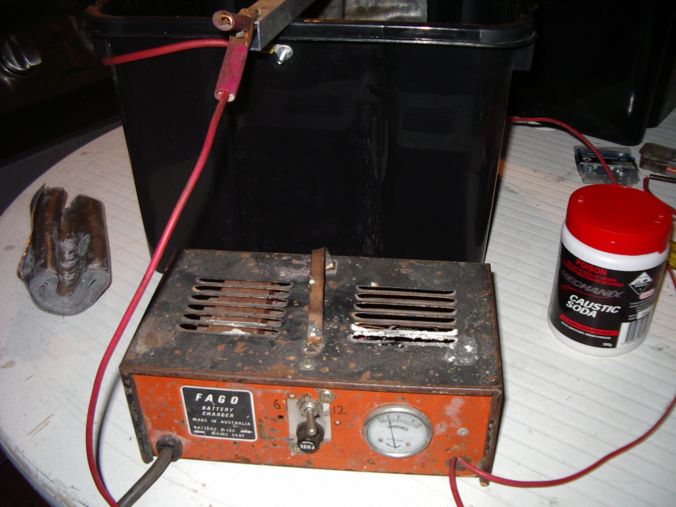
A 12V battery charger or power supply
The battery charger cannot be the automatic type, otherwise it will stop delivering power before the anodising is complete.
The battery charge should be MINIMUM 5Amps, but the power required depends on the surface area of the part you are anodising. The more surface area, the more current will be drawn.
- Fill the tub about half way with a mix of sulphuric acid and distilled water - same as whats in your car battery.
- The other tub is used for caustic soda - the stuff used to unblock drains.
- You will also need at least 10L of distilled/demineralised water.
- You'll need some dye the colour you want your parts. I used Dylon Ebony Black dye - it comes in small pots, about 25mm diameter and 10mm deep.
- You want this in a bowl etc mixed at about twice as strong as the instructions say (so half the amount of distilled water)
- You will need a pot with the dye in it, big enough to submerse your part completely, and also a pot of distilled water (which you will boil) also big enough to submerse the part completely.
Process is:
- Jam aluminium wire into a thread or a hole in the piece to make as good a connection as you can. If the wire anodises before the part, it will no longer conduct current to the job and the job will not anodise properly. If possible, weld the aluminium rod to the piece somewhere that won't be seen. Welding gave me my best results by far, because you don't have to worry about the joint between the wire and part anodising and stopping current flow.
- Dip the aluminium into the caustic soda for 15-30 mins. This will clean it. Do not inhale the gasses.
- Rinse the part in distilled water, or under the tap and then dip it in the distilled water. If the part has turned black due to other metals in the alloy, wash the part properly with soapy water, then rinse in distilled water.
- Hang the part in the acid bath and apply power. Leave for 45 mins to an hour
- Remove from acid bath and rinse in distilled water
- Submerge part completely in warm dye. Leave for 15 mins.
- Bring the temperature up of the dye up slowly until its close to boiling
- Remove the part from the dye and immediately submerse into a pot of boiling distilled water. Leave to boil for 30 mins.
- Remove part and wash under cold water then rub down with a soft rag. A small amount of dye may leak when you first put the job into the boiling water, but it wont be much. A small amount of dye will rub onto the rag also.
Be careful not to breathe any of the gasses that emit from either the caustic tub or the anodising tub.
It is handy to buy a bag of bicarb soda and keep a container of bicarb soda/water mix in case you spill any acid. You can pour this onto the acid to neutralise it, and can also stick your hands in it, or rub it on you if you get any acid on you.
Two Plastic Tubs
One of them I drilled a hole in opposite sides and bolted two pieces of lead strip connected together around the outside of the tub by a piece of wire.
Lead flashing for roofing works fine.
A 12V battery charger or power supply
The battery charger cannot be the automatic type, otherwise it will stop delivering power before the anodising is complete.
The battery charge should be MINIMUM 5Amps, but the power required depends on the surface area of the part you are anodising. The more surface area, the more current will be drawn.
- Fill the tub about half way with a mix of sulphuric acid and distilled water - same as whats in your car battery.
- The other tub is used for caustic soda - the stuff used to unblock drains.
- You will also need at least 10L of distilled/demineralised water.
- You'll need some dye the colour you want your parts. I used Dylon Ebony Black dye - it comes in small pots, about 25mm diameter and 10mm deep.
- You want this in a bowl etc mixed at about twice as strong as the instructions say (so half the amount of distilled water)
- You will need a pot with the dye in it, big enough to submerse your part completely, and also a pot of distilled water (which you will boil) also big enough to submerse the part completely.
Process is:
- Jam aluminium wire into a thread or a hole in the piece to make as good a connection as you can. If the wire anodises before the part, it will no longer conduct current to the job and the job will not anodise properly. If possible, weld the aluminium rod to the piece somewhere that won't be seen. Welding gave me my best results by far, because you don't have to worry about the joint between the wire and part anodising and stopping current flow.
- Dip the aluminium into the caustic soda for 15-30 mins. This will clean it. Do not inhale the gasses.
- Rinse the part in distilled water, or under the tap and then dip it in the distilled water. If the part has turned black due to other metals in the alloy, wash the part properly with soapy water, then rinse in distilled water.
- Hang the part in the acid bath and apply power. Leave for 45 mins to an hour
- Remove from acid bath and rinse in distilled water
- Submerge part completely in warm dye. Leave for 15 mins.
- Bring the temperature up of the dye up slowly until its close to boiling
- Remove the part from the dye and immediately submerse into a pot of boiling distilled water. Leave to boil for 30 mins.
- Remove part and wash under cold water then rub down with a soft rag. A small amount of dye may leak when you first put the job into the boiling water, but it wont be much. A small amount of dye will rub onto the rag also.
Be careful not to breathe any of the gasses that emit from either the caustic tub or the anodising tub.
It is handy to buy a bag of bicarb soda and keep a container of bicarb soda/water mix in case you spill any acid. You can pour this onto the acid to neutralise it, and can also stick your hands in it, or rub it on you if you get any acid on you.
DIY Anodising can be great fun, rewarding, and save you some pennies. If you want to get fancy, you can actually paint the dye onto your part in different colours instead of dipping into the dye.
Here are the rearsets I did for my GP Relplica Bike Project.
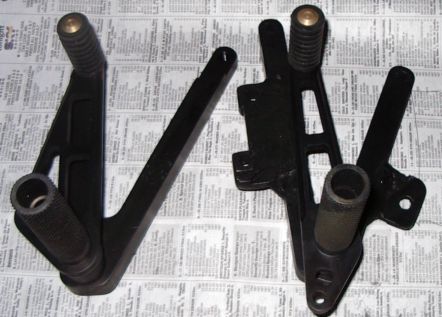
Here are the rearsets I did for my GP Relplica Bike Project.