
Ahhh OK. Gotcha. Problem solved now anyway.hybrid wrote:I simply can't store everyone's photos here. We have limited space on the server, and the attachment feature is horrible anyway.mungus wrote:Anyway as for some reason it says I've reached my upload limit of 10 photos again I'll spell out the second part of the intro to this project, that is what I'm aiming for.
Finally - the Bullitt begins! :-)
Moderator: Moderators
Re: Finally - the Bullitt begins! :-)
Grumpy old git! 68’ S code Fastback

Re: Finally - the Bullitt begins! :-)
Cool.. it looks like you've got a good starting point there anyway with that car, even if the assholes damaged it on the way in.
Re: Finally - the Bullitt begins! :-)
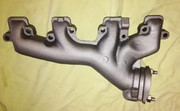
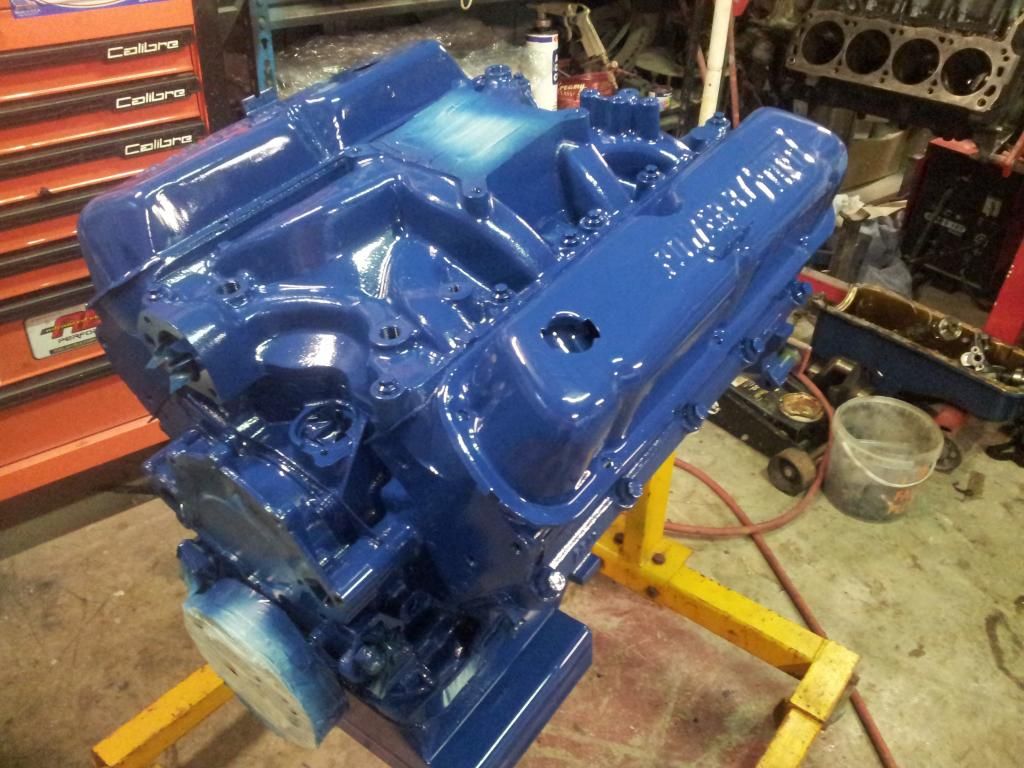
One of the first things I did as a sheet metal distraction, was to blast, paint, bag and store the intake and exhaust manifolds. As they were all date correct and serviceable. I bought a few NOS OEM intake fittings and pipes from Bill at Mansfield Mustangs to complete the intake. The blue in the photos isn't that true I'm afraid, but you get the idea...
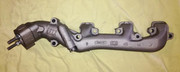
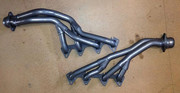
I don't dislike the look of the OEM offerings that much, just the weight is appalling. The Blue Thunder medium riser aluminium "PI" type intake I bought (2nd from bottom) is 45 lbs lighter... The FPA headers (bottom photo) are about 10 lbs lighter (and flow way better) and the December 67' OEM water pump was 8 lbs heavier than the Edelbrock aluminium one I bought (painted FORD corporate blue) , so it'll look standard at a glance. The lighter weight will offset the "Perfect Fit" AC kit over the front end, (and then some).
It seems the front end ploughing around when cornering at speed was mentioned as an unwelcome characteristic of S codes. If I went the whole hog and ran alloy heads I could get the complete motor down to 302 weights, at about 550 lbs, but as it is it'll be a shade under 590 lbs. A useful saving from OEM of 650-660 lbs.
The BT intake is supposed to flow pretty darn well according to the intake bible (Jay Brown's "Great FE Intake Comparo" book) and FE builder forums, (almost tied in 1st place overall with the Edelbrock RPM Performer, but looking far more factory). I'm also painting that blue to match and maintain the factory look I'm aiming for, but it is so purttee like it is.
Last edited by mungus on Sun Mar 18, 2018 4:50 pm, edited 15 times in total.
Grumpy old git! 68’ S code Fastback
Re: Finally - the Bullitt begins! :-)
They never fit they are generally too short and you have to cut and weld the ends to get them correct. Most repro stuff needs trimming , adding to with weld, bending etc, its no big dea,l still easier then trying to fix an old Holden where you can just buy small repair sections that dont fit either. The best thing about these cars you can buy new stuff, guys who cant get it fit aint trying hard enoughmungus wrote:Yup point taken, I have had enough of uploading here. :-(
I've just registered for photobucket so will add some links to photos soon.
I'll be away over the next few days so might not be much activity for a while.
The rear axle was basically finished today - full rebuild with 3.7 gears and currie axles, all new brakes etc. And I've taken a few photos of that, so once the outline is done I'll put that bit up. I've tried to go concours on the axle exterior, but need to ascertain the daubs etc to finesse the end result to my satisfaction. Other than that it's all done. Was nice to get the first major system completed. Back into the bodywork next week, bloody Dynacorn rear valance is still resisting my attempts to get a nice fit...
Re: Finally - the Bullitt begins! :-)
Shaunp wrote:Yup figured that. I can see how to do it no worries, just needs some time put in.mungus wrote:Yup point taken, I have had enough of uploading here.
They never fit they are generally too short and you have to cut and weld the ends to get them correct. Most repro stuff needs trimming , adding to with weld, bending etc, its no big dea,l still easier then trying to fix an old Holden where you can just buy small repair sections that dont fit either. The best thing about these cars you can buy new stuff, guys who cant get it fit aint trying hard enough
I have already cut off the mounting tabs on the ends and will be fabbing my own soon. Other than that mines OK. Screwed up nicely on the top, just crap fit on the ends. Not impressed with the steel thickness though, pretty bloody thin IMHO.
Then I have to fill the reversing light holes (Bullitt). I figure I'll put a pair of little LED units under the valance somehow, being as how I like seeing where I am backing...
Last edited by mungus on Sun Mar 18, 2018 5:22 pm, edited 2 times in total.
Grumpy old git! 68’ S code Fastback
Re: Finally - the Bullitt begins! :-)
Not an FE but 69ish's 408 stroker I built, he wanted a sleeper look when you open the hood on his Mach1 . This has RPM intake and alloy heads, I ground the Edelbrock casting marks etc off the intake then really hammered it with a sand blaster to put some grain back in the alloy part. Etched it and painted it in eye matched Dupont 2k . In the bay with the shaker on it its quite stock looking exhaust & MSD dissy aside.

Re: Finally - the Bullitt begins! :-)
Never had trouble with the mounts normally just have to rework the ends some


Re: Finally - the Bullitt begins! :-)
Looks grouse Shaun, good job! Mine came with new boxed up Cobra alloy valve covers but I sold them on eBay ASAP and got a set of new chromed PBF jobs - factory correct and all that. Quite like them.
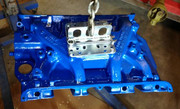
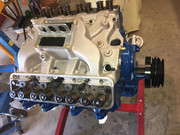
The more I see colour matched engines the more I think I'll paint my intake to match too. Luckily the BT MR intake has numbering etc that looks rather like FORD gear, and the texture is similar, so I'll leave the structure as such, alone.
Already done the water pump. Tried all 3 VHT Ford blues, none seemed bang on; although their Old Ford Blue seemed closest to the remnants of factory motor paint that both my FE blocks revealed after hot tanking, although it didn't match the SD replica 67' 390 air cleaner I have. (didn't want to run the OEM 68 air cleaner; too restrictive, complicated, ugly and the snorkel fouls my shock tower brace. {BTW the movie cars used the Ford HiPo chromed air cleaners}). Later on I tried some POR-19 Ford corporate blue. Its smooth, but too dark for 68’, and a bit runny when spraying too. But who really knows... I think the who's blue is right argument is a bit like the what beer is best one. It just goes on and on...
Last edited by mungus on Sun Mar 18, 2018 4:57 pm, edited 7 times in total.
Grumpy old git! 68’ S code Fastback
Re: Finally - the Bullitt begins! :-)
Its hard to find ford blue, we started with the stripe colour of XC cobra's and tinted it till it looked nice. It comes up super shiny and the 2k is nice and durable. The engine has done a good bit of driving now still looks pretty good.
Re: Finally - the Bullitt begins! :-)
Mungus when you choose share image from photobucket, use the "img" tags and paste straight into the forum. The image will then display directly in your post.
Re: Finally - the Bullitt begins! :-)
Thanks, good tip. I'll check it out.hybrid wrote:Mungus when you choose share image from photobucket, use the "img" tags and paste straight into the forum. The image will then display directly in your post.
UPDATE: Photobucketing done now. But I'm afraid I can't free up your server space or clean up my posts by deleting the old upload links. Simply won't do it. I click delete and it looks like its done it when the editing page refreshes, but the "edited" post is unchanged...
Still at least the photobucket stuff is sorted.
Last edited by mungus on Fri Feb 10, 2017 1:37 am, edited 2 times in total.
Grumpy old git! 68’ S code Fastback
Re: Finally - the Bullitt begins! :-)
So just before sandblasting I had rotary wire brushed off a few areas I had suspicions about.
After inspection I decided to replace the LHS front torque box. It was patchable, but being as how the car was on the rotisserie and the replacements aren't mega bucks I thought it better to make it right. During the process I discovered a bit of rust on the associated front frame rail. So I cut that out and replaced the affected parts, phosphoric treating and anti-rust painting as I went. I'm using HiChems black etch primer and Sikaflex 227 black auto body sealer as I go.
In the end the underside will be finished with Intergard 2K red oxide and the engine bay and front end done in HiChem's black semi gloss 30.
Heres some photos I took along the way. Again apologies they are just smart phone jobs.
Last edited by mungus on Sun Mar 18, 2018 6:27 am, edited 8 times in total.
Grumpy old git! 68’ S code Fastback
Re: Finally - the Bullitt begins! :-)
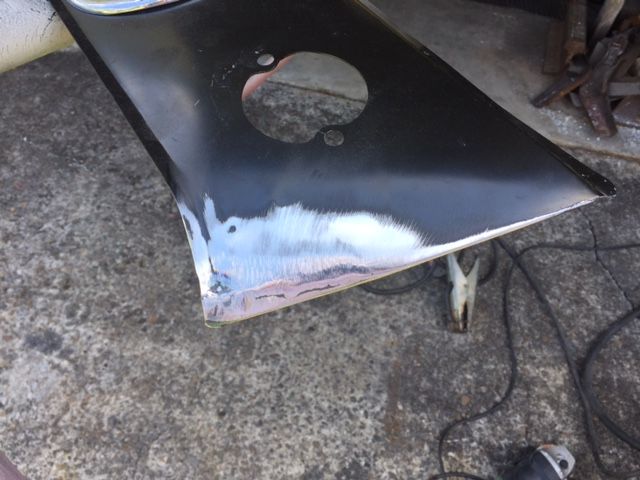
And then there was the rear floors and rear section of the transmission tunnel. This annoyed me as they were the original ones, complete with OEM paint overspray etc and matching shift stamps. As I mentioned they had been buggered by the towee in NY when he chucked in heavy sharp edged parts in a jumbled pile. FE block, Diff heads, C6, heads etc. What a moron!
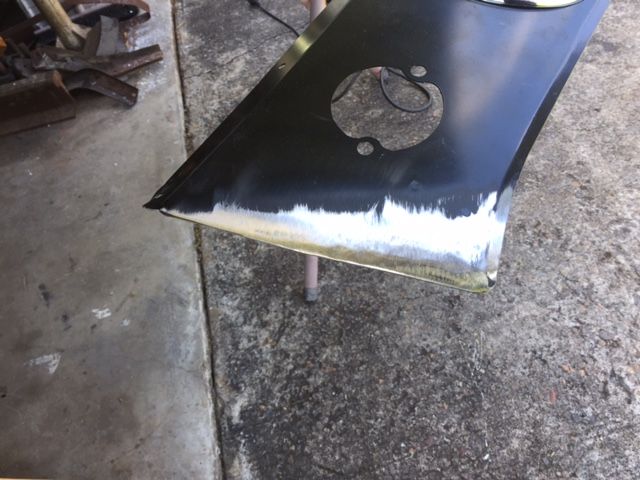
I started beating them back into shape and although I got the basic shape back it soon became obvious I was fighting a losing battle and would never get a nice result. So out they came... At the same time I took the opportunity to replace the RHS rear floor extension which had a couple of pin holes, nothing major but I wanted to see what the underside and interior of the RHS rear torque box was like. Of course a pair of new seat platforms was also required. I discovered some have stiffening beams and others don't! Dynacorn's platforms/risers did, however the Canadian unprimed ones I saw (forgotten the brand right now sorry), were thicker steel but didn't have them. I wanted the beams...
A trap for new players I fell into was not knowing that there is a difference between the OEM fastback ones and the convertible type rear floor extensions (they have a big diagonal fold across them). This is what Dynacorn use in their new bodyshells (I imagine it adds stiffness), but its not per OEM and of course would be a mismatch for the other side. So now I have a spare new convertible style one, primed, drilled for welding n all! Cheap to a good home if anyone wants it.
Last edited by mungus on Sun Mar 18, 2018 6:28 am, edited 8 times in total.
Grumpy old git! 68’ S code Fastback
Re: Finally - the Bullitt begins! :-)
Is that not (first photo) a 65/66 rear floor panel?

Last edited by boofhead on Fri Feb 10, 2017 9:43 pm, edited 1 time in total.
I will someday think of something clever to say.
Re: Finally - the Bullitt begins! :-)
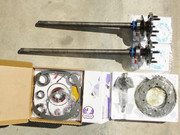
Anyway time for another system. My car came on its wheels (just). The rear axle was very crusty but appeared to be mostly original.
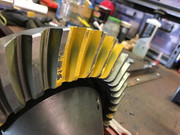
I also got a spare 3rd member with it, supposed to be a G case (big bearing) with a 3.9 set. More BS from the PO. It was a medium bearing with an open 3.0:1 gear set. So a quick inspection on the bench (.10 lash and centred pattern with no bearing wear noticeable), so off to eBay that went and was quickly sold. I picked up a "G" casing set from the Gold Coast a few weeks back as a spare so I can play with ratios if I feel the need. Its even date correct! Whoo hoo.
The fitted 3rd member (with mangled tag) appeared to be correct, carrier (3.062 side bearing "G"case, correct for my car) dated late Jan 68', as was the matching pinion support. (My car was ordered Feb and built early March). It had the OEM standard ford 3.25:1 gearset with minimal wear, so they have been cleaned, tagged, bagged and stored away.
The spool was an Auburn cone style posi unit, so non factory but they have the reputation of being a smooth operator and its in decent shape, testing as 140+ ft/lbs on the bench using my pretty standard home made rig with cut off 28 spline axles'; one axle welded to a 1/2" socket and the other ground flat on 2 sides to pin in a sturdy vice. I bought a new tag from Marti Auto Works and a set of correct AMK nuts and copper washers as finishing touches.
Couldn't get a concours correct RHS hand brake cable unfortunately, but the new one fitted will do until one comes along. The old one was toast! Likewise I need to find some correct crimp style hose clamps so I can put one at the base of the vent hose. Small points, but if you can do it right for small money, then why not I figure...
I ordered a big bearing rebuild set along with Yukon 3.7:1 gears and commenced stripping and refinishing the rear axle housing and cases. The brake plates got blasted and everything etch primed. All new brakes were in the same order, including new drums which I simply prep-soled and finished with VHT cast iron chassis paint. I've been using this on almost everything that was supposed to be bare steel or iron from the factory. The exception being the diff carrier and support machined sections, which I polished off and clear coated.
The VHT cast iron paint IMHO looks nice and goes on easily.
I finished the axle housing with 2K HiChem 30 semi gloss. Looks nice.
I did use a new Currie 1330 long/wide yoke, I have blasted and stored the OEM one which had a sizeable balancing drilling. I'll get Duggans to make me a nice new driveshaft as my C6 one (OEM complete with daub rings), is 4 inches too short for a manual trans and the tube is pitted to buggery anyway. More garage art for my barn wall.
They only thing I haven't decided one is whether to leave the dust shield gold zinc as it is now, as I suspect they were just bare steel from FORD. If I confirm that I'll VHT cast iron that too. Easy to do...
All new wheel nuts of course. I have a set of new locknuts too, they'll go one once shes roadworthy. I had some jerk try to steal the mini-lites off my Mini 1275 GT when I was at uni. He gave up when he found he couldn't vice grip the lockers off the last 2 wheels. Lesson learned by me though!
I had to paint the new brake junction block with some brass paint as the so called "concours" part I bought from CJ's showed up as made in China with bright zinc finishing. GRRRR. End result looks fine to me while I try and source a completley correct one. My old one was the OEM 1968 brass unit. Pity the hose was buggered.
Also bought a pair of new Currie 28 spline axles. My old ones had a couple of minor nicks under the bearings and I have no idea what their history is, that plus the Curries are supposed to be around 15% stronger than stock, so approaching 31 spline strength. The only thing is if you are being concours anal about it, is the ends don't have the same cut outs as stock, however that's hidden under the bearing caps on my lovely new TT-D's anyway...
Put her all back together after painting the 3rd member per some concours forum advice, although I've yet to apply daubs etc. I know the basics for my car (yoke mark and casing yellow blobs etc) but not all the exact marking details. I'll get there eventually...
The new gears centred up OK using a 10 thou pinion shim, lash at 9 thou, case spread was spot on and the bearing drag felt right. It patterned OK and runs nicely on the bench. Time will tell I suppose. I'll run her in softly per the Yukon recommendations and hopefully she will be a nice diff.
The 3.7 equates to 2,074 RPM in 5th at 110 kph on the freeway, with the new Tremec TKO600 kit I got from MDL. With hindsight I think I would have bought the .82 OD and kept the 3.25 gears, as the FE can torque through the first 4 like a rocket at 3.25. That would have given me 2,657 RPM at 110 kph, which I think I could have lived with. We'll see. It should go very well off the line with the 3.7 and have a nice gentle cruise with my mild COMP roller cam and the .64 OD. If the bottom 4 end up being a pain being too low, I'll swap the 5th out and pop the 3.25's back in.
Last edited by mungus on Sun Mar 18, 2018 5:24 pm, edited 18 times in total.
Grumpy old git! 68’ S code Fastback