
Thanks for the guidance lads. Nothing like a bunch of blokes yelling GO FOR IT.
Well anyway, chassis rail is patched after I finished my other chores and looks like it has replicated the measurements and sits in properly. Fortunately 1969 Ford is not exactly the land of fine precision so a mil is not exactly a big thing.
70 Mach 1 - Slowly
Moderator: Moderators
Re: 70 Mach 1 - Slowly
Cheers
Craig
Craig

Re: 70 Mach 1 - Slowly
Or an inch in the case of US measurements .........Chux wrote: Fortunately 1969 Ford is not exactly the land of fine precision so a mil is not exactly a big thing.
Kerry
To our wives and sweethearts. May they never meet
To our wives and sweethearts. May they never meet
Re: 70 Mach 1 - Slowly
Lol. Aint that so true.ozbilt wrote:Or an inch in the case of US measurements .........Chux wrote: Fortunately 1969 Ford is not exactly the land of fine precision so a mil is not exactly a big thing.
Looking at my hood today and you can see the squash marks where the panel fitter has bent it to match the guard line. They were certainly hand built
Cheers
Craig
Craig

Re: 70 Mach 1 - Slowly
Great stuff.
A 408 is a nice street engine at 500 hp. You will love it.
A 408 is a nice street engine at 500 hp. You will love it.
I will someday think of something clever to say.
Re: 70 Mach 1 - Slowly
Having a shed load of trouble getting my welder to run .6mm wire. Running the right roller but its stubbing and then the wire bends and then crimps at the feed roller and I end up pulling another 3 m of wire out of the gun and binning it. Just about lost my banana today.
Welder is a Unimig 250 inverter. The guys have ordered me in a 5kg spool adapter which will bring it back to the centre line for the feed but I have a sneaking suspicion that the spool I have is rooted. The wire is sitting down on itself in patches and gets really tight to pull out - Boss brand wire. 15kg spools are bloody expensive....but the frustration of not being able to weld is costing me time and energy.
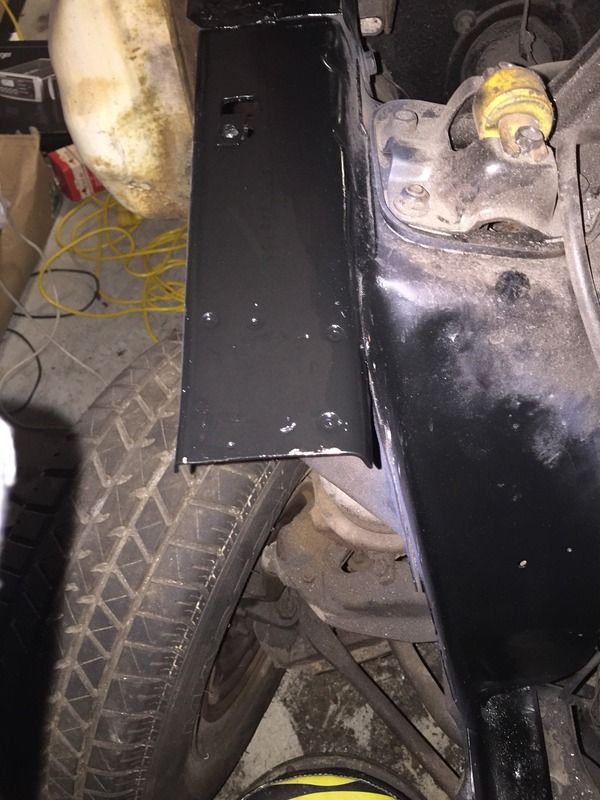
Went back to .9 and I at least got the heavier metal welded. So cross member is replaced, got the patch welded in to the rad support and the chassis rail extension welded on.

I'll tidy up the grinds when the engine comes out.

Welding in a patch in the apron at present - I reckon it would be a shed load easier with .6mm wire feeding properly, but I will persevere with .9mm and get it done so I can move on. Hope that I will have that finished tomorrow afternoon.
Welder is a Unimig 250 inverter. The guys have ordered me in a 5kg spool adapter which will bring it back to the centre line for the feed but I have a sneaking suspicion that the spool I have is rooted. The wire is sitting down on itself in patches and gets really tight to pull out - Boss brand wire. 15kg spools are bloody expensive....but the frustration of not being able to weld is costing me time and energy.
Went back to .9 and I at least got the heavier metal welded. So cross member is replaced, got the patch welded in to the rad support and the chassis rail extension welded on.
I'll tidy up the grinds when the engine comes out.
Welding in a patch in the apron at present - I reckon it would be a shed load easier with .6mm wire feeding properly, but I will persevere with .9mm and get it done so I can move on. Hope that I will have that finished tomorrow afternoon.
Last edited by Chux on Sun Jul 09, 2017 5:57 am, edited 1 time in total.
Cheers
Craig
Craig
Re: 70 Mach 1 - Slowly
I feel your pain, 0.6 is a bit of a pain and to be honest I will not go down that path again. I have had a pretty good run but a lot of wire ends up in the bin.
Re: 70 Mach 1 - Slowly
Greetings from Manila.
If you were running 0.9 wire and swapped to 0.6 without changing the liner, then that is a real issue. MIG's are set up for the wire size all the way from feed to the tip.
Another issue can be trying to push a small wire through a hose that is too long. Too sharp a turn in the hose can also cause issues. Make sure you position the welder so that the hose runs as straight as possible to the hand piece. A gradual bend is ok.
Clamping pressure on the feed rollers should only be enough to push the wire not distort it.
Kerry
To our wives and sweethearts. May they never meet
To our wives and sweethearts. May they never meet
Re: 70 Mach 1 - Slowly
Thanks for the tips Kerry. I will pop in and see the lads at Collins tomorrow about a new liner.ozbilt wrote:Greetings from Manila.
If you were running 0.9 wire and swapped to 0.6 without changing the liner, then that is a real issue. MIG's are set up for the wire size all the way from feed to the tip.
Another issue can be trying to push a small wire through a hose that is too long. Too sharp a turn in the hose can also cause issues. Make sure you position the welder so that the hose runs as straight as possible to the hand piece. A gradual bend is ok.
Clamping pressure on the feed rollers should only be enough to push the wire not distort it.
Does that mean its easier to have two guns - one for .6 and one for .9?
Cheers
Craig
Craig
Re: 70 Mach 1 - Slowly
Thanks Kerry, I had no idea the liner had to be replaced.ozbilt wrote:Greetings from Manila.
If you were running 0.9 wire and swapped to 0.6 without changing the liner, then that is a real issue. MIG's are set up for the wire size all the way from feed to the tip.
Another issue can be trying to push a small wire through a hose that is too long. Too sharp a turn in the hose can also cause issues. Make sure you position the welder so that the hose runs as straight as possible to the hand piece. A gradual bend is ok.
Clamping pressure on the feed rollers should only be enough to push the wire not distort it.

Re: 70 Mach 1 - Slowly
Nice legs 
Re: 70 Mach 1 - Slowly
Thanks for noticing. The are not what you would call delicate pins - no one will think I am indig with my calfs anyway.Husky65 wrote:Nice legs
Cheers
Craig
Craig
Re: 70 Mach 1 - Slowly
Liners are almost as easy to change as the wire. Not worth the expense buying 2 guns if you are not constantly swapping wire sizes.Chux wrote:Thanks for the tips Kerry. I will pop in and see the lads at Collins tomorrow about a new liner.ozbilt wrote:Greetings from Manila.
If you were running 0.9 wire and swapped to 0.6 without changing the liner, then that is a real issue. MIG's are set up for the wire size all the way from feed to the tip.
Another issue can be trying to push a small wire through a hose that is too long. Too sharp a turn in the hose can also cause issues. Make sure you position the welder so that the hose runs as straight as possible to the hand piece. A gradual bend is ok.
Clamping pressure on the feed rollers should only be enough to push the wire not distort it.
Does that mean its easier to have two guns - one for .6 and one for .9?
Kerry
To our wives and sweethearts. May they never meet
To our wives and sweethearts. May they never meet
Re: 70 Mach 1 - Slowly
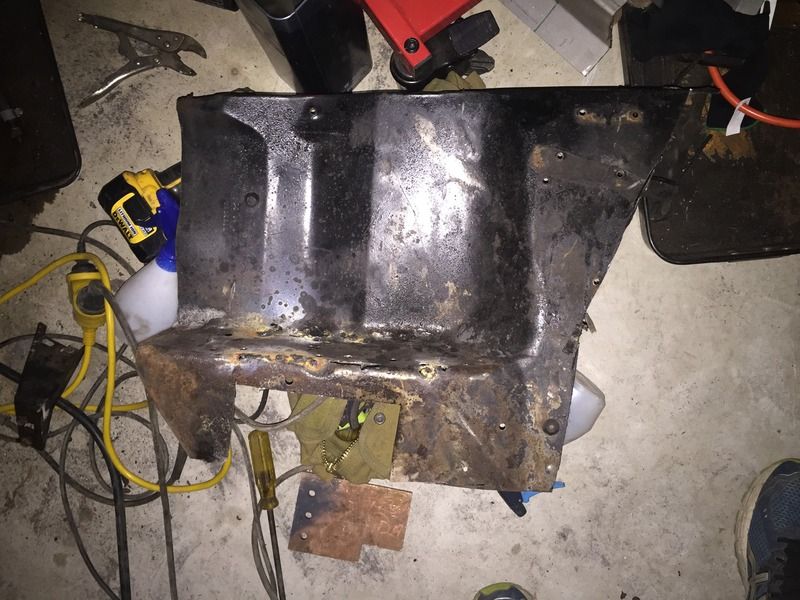
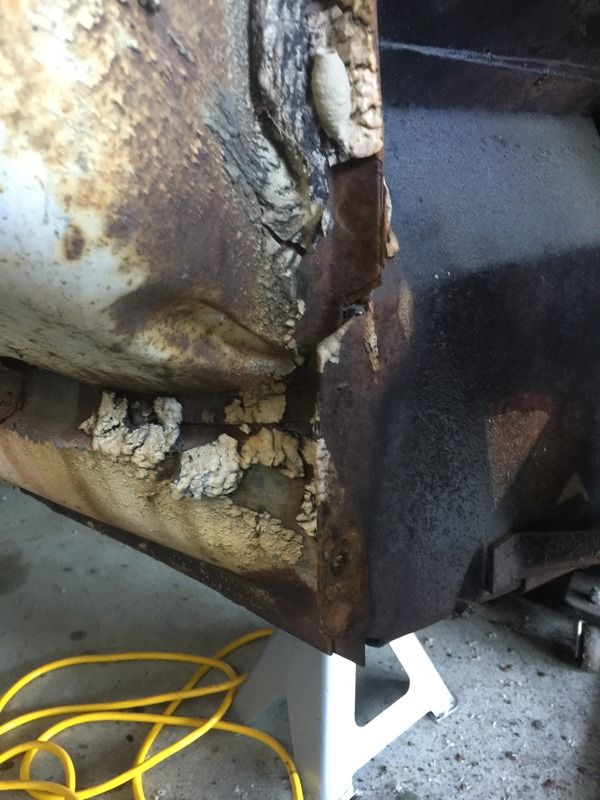
Well I have admitted defeat over retaining the front apron (battery side). MIG welds were ugly, the steel was just too patchy to avoid blow through (even tried the TIG at 10amps it was just eating it) so drilled out and will put in a new one. Couple of what I assume are typical rust holes in the top lip of the apron to patch up as well. At least it looks like 2mm so should be able to get it looking pretty good.
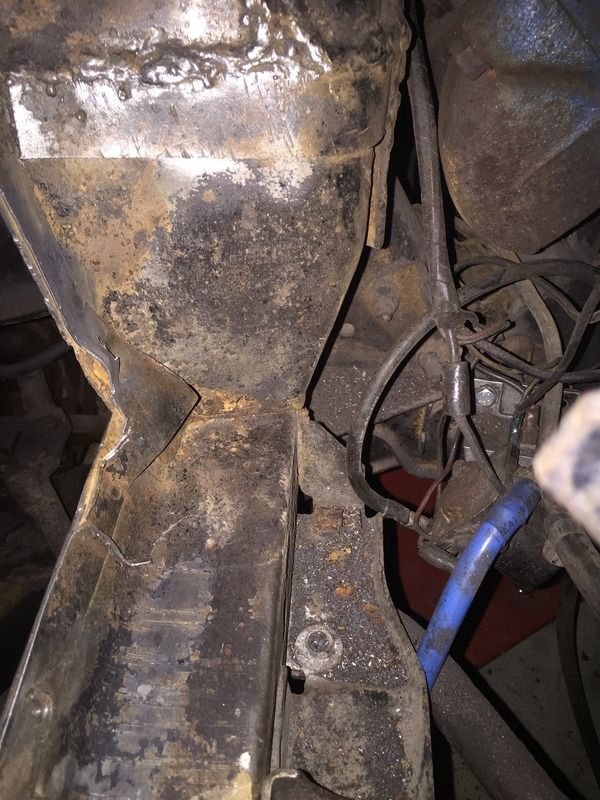
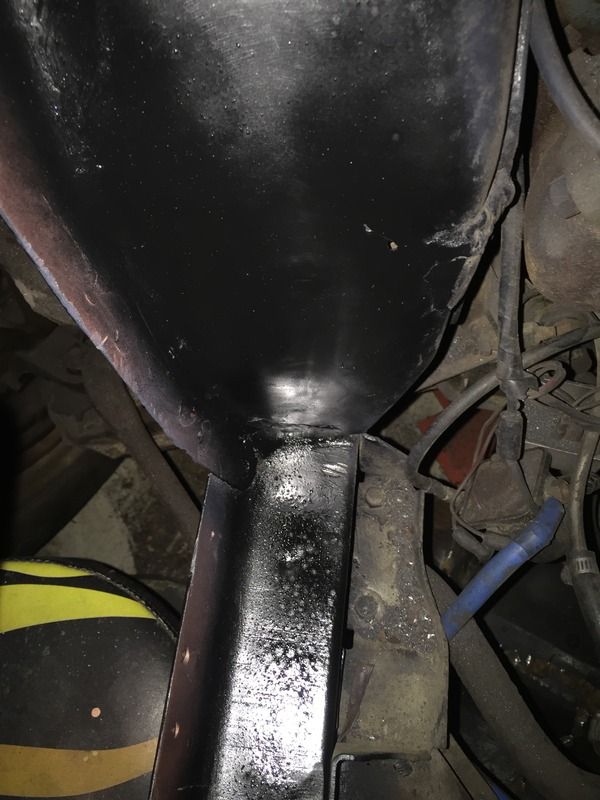
Nasty looking hole in the shock tower where it meets the chassis rail. Will patch it initially and reassess whether its a replacement later. At present engine is in so replacing the tower is not achievable. The bit of crappy 3mm wrap on the tower is a bit of an unknown. The wandering weld is ??? They have used an oxy to cut a hole of the other side to access the grease zerk (same on DS). Its FARKING ugly. Will see if I can clean it up.
Haven't had a good chance to check the chassis rail below the upper control arm but it feels solid after digging around with a large blade screwdriver.
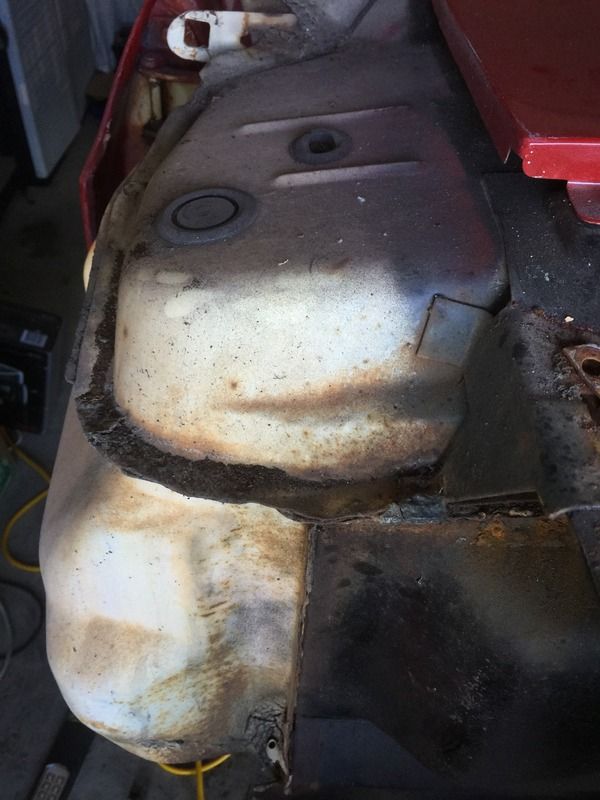
With the PS guard off its apparent the torque box is pretty much stuffed (DS is as well) ...suffering mexican putty plating. The cowl (plenum) looks like its ok BUT will need to pull the rubber grommets and have a decent look and prod around.
Its not rusted out under the windscreen so that is a positive
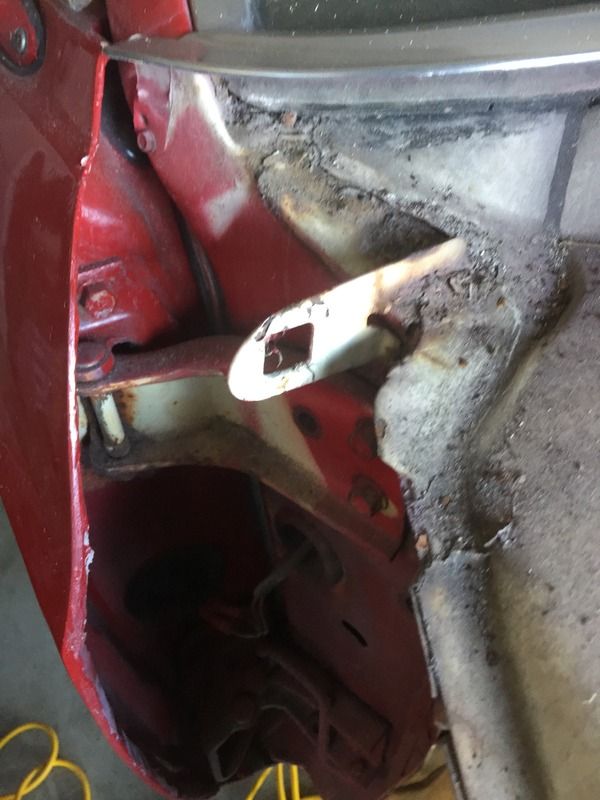
Weirdest thing is the front guard. Signs of some damage at some point - bit of damage in the front front wheel arch corner where the angular shield behind the headlight bucket and the lower valance meet. But rear edge of the guard where it the seam is rolled looks like it was opened up at some point....will have to put up a pic for an opinion. Inside the guard with the reinforcing piece is all original with no sign of damage or repair (surface rust etc is consistently the same).
Anyway off to Qld Mustang spares for an apron to weld in this weekend.
While the guard is off I will also do replace hinge pins and bushes. Apparently easier to do with door on car!


Nasty looking hole in the shock tower where it meets the chassis rail. Will patch it initially and reassess whether its a replacement later. At present engine is in so replacing the tower is not achievable. The bit of crappy 3mm wrap on the tower is a bit of an unknown. The wandering weld is ??? They have used an oxy to cut a hole of the other side to access the grease zerk (same on DS). Its FARKING ugly. Will see if I can clean it up.
Haven't had a good chance to check the chassis rail below the upper control arm but it feels solid after digging around with a large blade screwdriver.

With the PS guard off its apparent the torque box is pretty much stuffed (DS is as well) ...suffering mexican putty plating. The cowl (plenum) looks like its ok BUT will need to pull the rubber grommets and have a decent look and prod around.


Its not rusted out under the windscreen so that is a positive

Weirdest thing is the front guard. Signs of some damage at some point - bit of damage in the front front wheel arch corner where the angular shield behind the headlight bucket and the lower valance meet. But rear edge of the guard where it the seam is rolled looks like it was opened up at some point....will have to put up a pic for an opinion. Inside the guard with the reinforcing piece is all original with no sign of damage or repair (surface rust etc is consistently the same).
Anyway off to Qld Mustang spares for an apron to weld in this weekend.
While the guard is off I will also do replace hinge pins and bushes. Apparently easier to do with door on car!
Cheers
Craig
Craig
Re: 70 Mach 1 - Slowly
Well a long weekend but not overly productive. I did get the tops of the aprons patched and have the apron prepped ready to go in.
Got rid of most of the metal strap that had been welded onto the tower...to finish the job will require engine out.
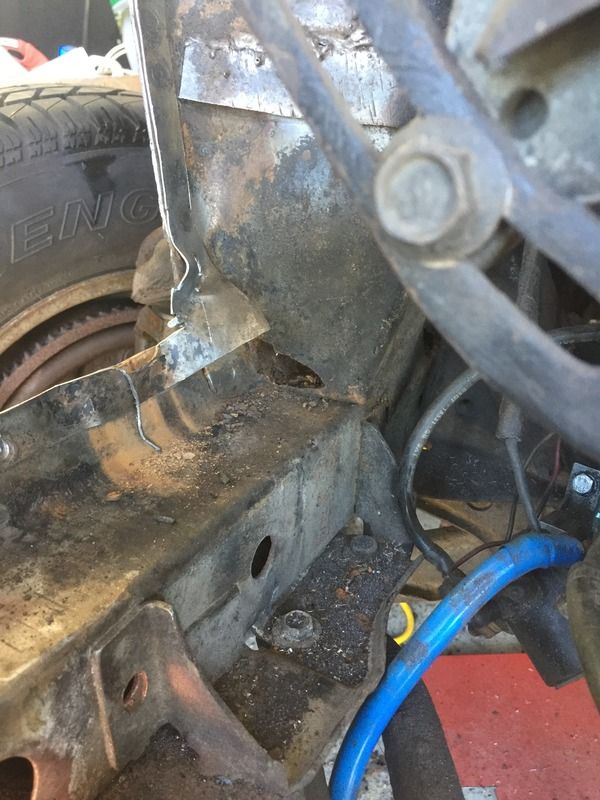
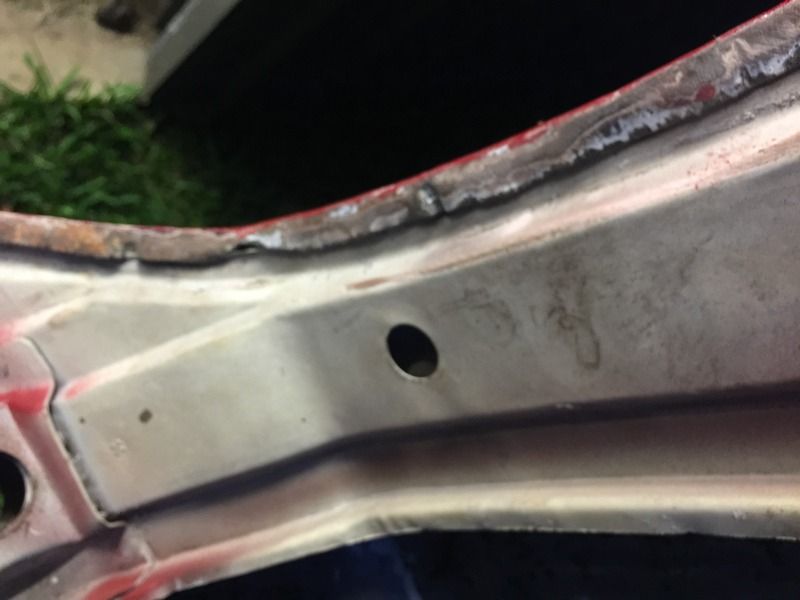
Question - I made a patch for the rust hole at the bottom of the tower where it meets the chassis rail...is it welded at that point?

Got rid of most of the metal strap that had been welded onto the tower...to finish the job will require engine out.

Question - I made a patch for the rust hole at the bottom of the tower where it meets the chassis rail...is it welded at that point?

Last edited by Chux on Tue May 02, 2017 7:48 am, edited 1 time in total.
Cheers
Craig
Craig
Re: 70 Mach 1 - Slowly
Because I am easily distracted I decided to clean up inside the PS fender - first thing was removing the mach 1 trim piece. Sadly not pristine like the DS - the PS looked a bit off and further examination reveals why.
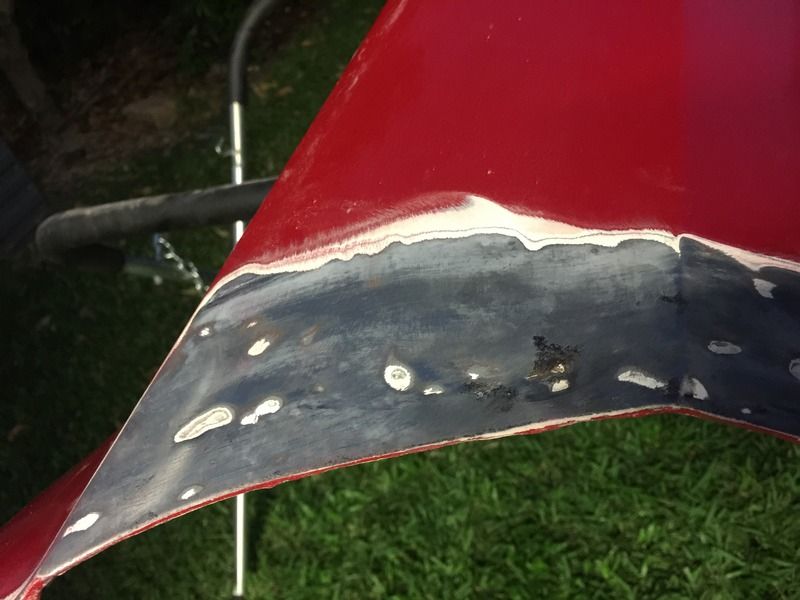
Nice rust hole in the lower fender under the trim, bit of a bend in the front section and its uneven on the inside just above where the mustang script sits, so I am thinking there is some bog there as well.
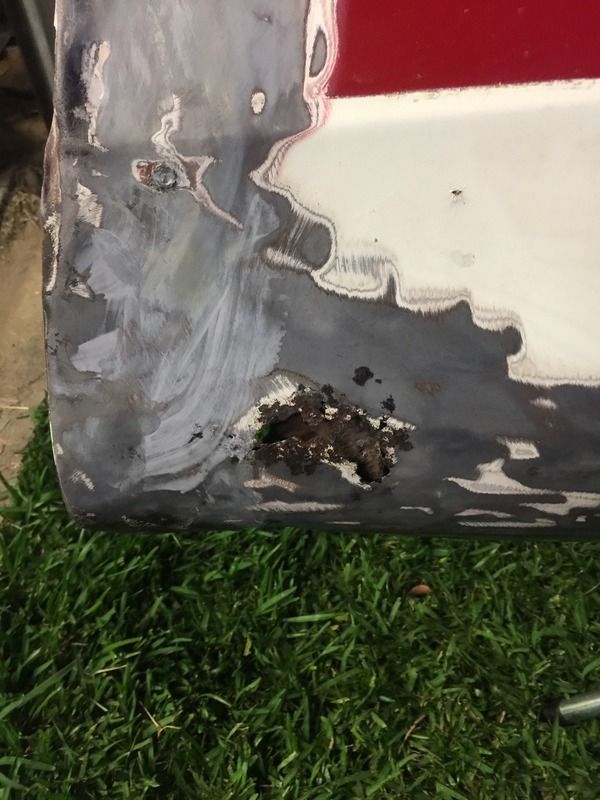
Seems impact damage that has had a solid layer of bog to fix it....this was after using a paint strip wheel on the grinder.
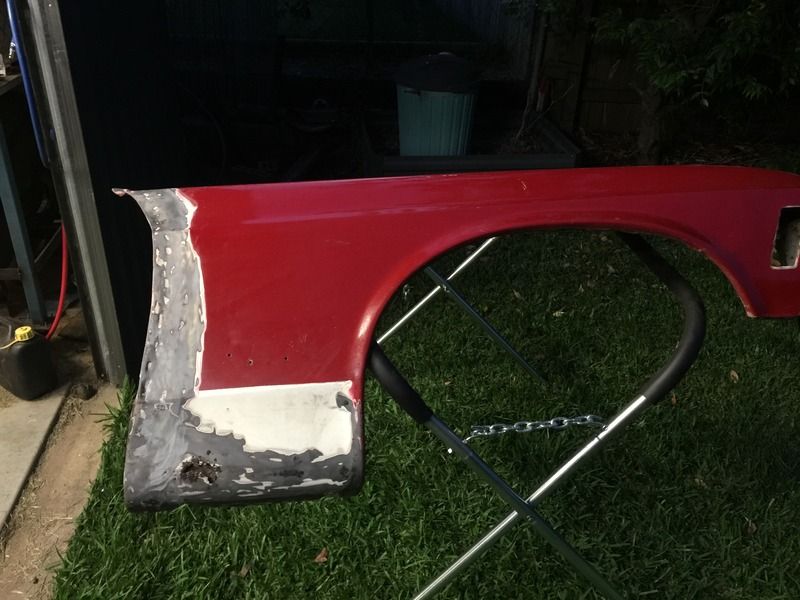
At least now I know why the fender edge had a rather dodgy fold over on the seam.
It looks like they thought about trying to do it properly then decided against it.
PS Door is equally average at the front seam, at present I am thinking a skin but until I get it off I wont know whether the shell has had a solid hit on it....seams ok but...
Anyway I will go and see my tame panel beater and see what he thinks about the guard and whether it is an economical repair. $490 for a new guard vs how many hours to fix it.
Nice rust hole in the lower fender under the trim, bit of a bend in the front section and its uneven on the inside just above where the mustang script sits, so I am thinking there is some bog there as well.

Seems impact damage that has had a solid layer of bog to fix it....this was after using a paint strip wheel on the grinder.

At least now I know why the fender edge had a rather dodgy fold over on the seam.


It looks like they thought about trying to do it properly then decided against it.
PS Door is equally average at the front seam, at present I am thinking a skin but until I get it off I wont know whether the shell has had a solid hit on it....seams ok but...
Anyway I will go and see my tame panel beater and see what he thinks about the guard and whether it is an economical repair. $490 for a new guard vs how many hours to fix it.
Cheers
Craig
Craig