Finally - the Bullitt begins! :-)

Create your project threads here if you prefer to keep them out of the regular forums

Moderator: Moderators

mungus
Mustang Star
Mustang Star
Posts: 523
Joined: Fri Jun 26, 2015 8:53 pm

Re: Finally - the Bullitt begins! :-)

Post by mungus »

So here's what I found. It was way too long. I had to chop off about 15mm off the back end. Not a biggy as its easier enough to reform and MIG a fold on.

Image

The wiring channel was round, not square and the fold for spot welding into the inner rocker was a joke.The 2 templates below show the difference between OEM and my repop.

Image

It was also too high for much of the length, so some manual squashing on the barn floor sorted that out. Again a sign of insufficient pressing.
Last edited by mungus on Sun Apr 21, 2019 10:07 pm, edited 1 time in total.
Grumpy old git! 68’ S code Fastback
mungus
Mustang Star
Mustang Star
Posts: 523
Joined: Fri Jun 26, 2015 8:53 pm

Re: Finally - the Bullitt begins! :-)

Post by mungus »

The end result was that the whole thing was about 3/8 to 1/2" too wide to fit. I'm not the only one as a quick look at the customer reviews of it on CJ's Pony Parts feedback comments shows. The solution in the end was to slice the wiring channel from end to end where the chamfer meets the bottom of the channel, using my plasma cutter. I then got a piece of 1.2mm panel steel folded 90 degrees with about 25 mm each side, clamped the whole lot together in situ and started slowly tacking my new channel in with lots of cooling, as you can get a whole lot of shrinkage along a thing this long. Removed it, took off the excess metal, loads of anti rust primer and I was ready for the final install. Here it is in process.

Image

One good side effect was that I discovered that whoever the bozo was who installed that rear quarter didnt MIG / spot the joint between the bottom of the quarter and the rear of the outer rocker. It had 2 self tappers and a pile of goo... So needless to say thats been fixed on this occassion. MIG plug welds and Sikaflex 227 aplenty.
Last edited by mungus on Tue Apr 23, 2019 7:22 pm, edited 2 times in total.
Grumpy old git! 68’ S code Fastback
mungus
Mustang Star
Mustang Star
Posts: 523
Joined: Fri Jun 26, 2015 8:53 pm

Re: Finally - the Bullitt begins! :-)

Post by mungus »

Anyway all done. I will skim coat the joint on the lower A pillar before paint obviously. But voila, a new dent free outer sill / rocker panel.

Image
Grumpy old git! 68’ S code Fastback
mungus
Mustang Star
Mustang Star
Posts: 523
Joined: Fri Jun 26, 2015 8:53 pm

Re: Finally - the Bullitt begins! :-)

Post by mungus »

Anyway this got me thinking that I am very close to the final underbody finishing. And shortly after painting out the engine bay and wheel wells / aprons. So after some more sikaflexing it was time to upgrade and restore my front suspension. Luckily most parts were serviceable, the only issue being the PO hand painted everything in what looks like black household enamel. YUK. So lots of blasting and painting undertaken, aiming for a factory look. The concours mustang guys have been great help with this.

While I was at it I did the Shelby drop holes. I had already bought a set of wedges stateside to make sure my ball joints are happy.

Image

Image
Grumpy old git! 68’ S code Fastback
mungus
Mustang Star
Mustang Star
Posts: 523
Joined: Fri Jun 26, 2015 8:53 pm

Re: Finally - the Bullitt begins! :-)

Post by mungus »

After rebuilding the upper control arms I discovered that mine being 3 bolt types, may not be OEM for a 68' GT390. Some said the 3 hole units didn't come in until 1970 so they'll be service units, some said no they came earlier but not at all plants, and some said all CJ's got the 4 bolts but not all the others... In any case they are certainly a common classic Mustang fitment as any decent sized Mustang web shop will show.

Anyway they are in good nick structurally and I had all the new parts for the 3 bolters, so as I'm neither racing nor entering concourse competitions, they are going back in. If I was racing then maybe I'd go for the 4 bolters, but that's not the intention. Heres some before, during and after shots. I also went for some new Scott Drake greaseable urethane spring perches. Quick respray to bare steel look and done.

Image

Image

Image

Image

Image

The supplied wedge bolts might be a tad long for my taste, but they'll do for now. I know some say they aren't necessary on a 1"drop, but what the hell, I prefer the angles to be right, and now's the time to do it. The eagle eyed may see the longer front bolts fitted to the pivot bolt. Taking Shaun's advice and will be popping a couple of 1/8" shims in there before alignment.
Last edited by mungus on Thu Apr 25, 2019 4:37 am, edited 9 times in total.
Grumpy old git! 68’ S code Fastback
mungus
Mustang Star
Mustang Star
Posts: 523
Joined: Fri Jun 26, 2015 8:53 pm

Re: Finally - the Bullitt begins! :-)

Post by mungus »

So the spindles, calipers, springs and sway bar all got the resto treatment too. Daubs per the concourse judges.
The car came with a set of new urethane sway mounts, plus I still have the OEM brackets. I may try the urethane ones out with a bit of copperkote to reduce squeaking. Already done my castor bars and bought new Scott Drake concourse lower arms, which supposedly have super duper bushes or some such. Added some adjustable Konis (period upgrade and still thought of as good stuff it seems). Went with new rotors & OEM standard calipers (gave them a shot of cast iron VHT header paint as they started rusting after only a few months on the shelf). All the hardware is new AMK stuff. So it will be nice to get it all back in looking schmicko. Hopefully not too far away.
The bloody iPhone is crap at showing the colours correctly, flash or no flash, made no difference. The VHT cast iron came out much darker in the photos... Such is life. :-)

Image

The splash guards are the later vented 69' types. But I prefer venting over concourse perfect on that one.

Image

Image

Image

Image

Image
Last edited by mungus on Sun Apr 21, 2019 11:36 pm, edited 5 times in total.
Grumpy old git! 68’ S code Fastback
mungus
Mustang Star
Mustang Star
Posts: 523
Joined: Fri Jun 26, 2015 8:53 pm

Re: Finally - the Bullitt begins! :-)

Post by mungus »

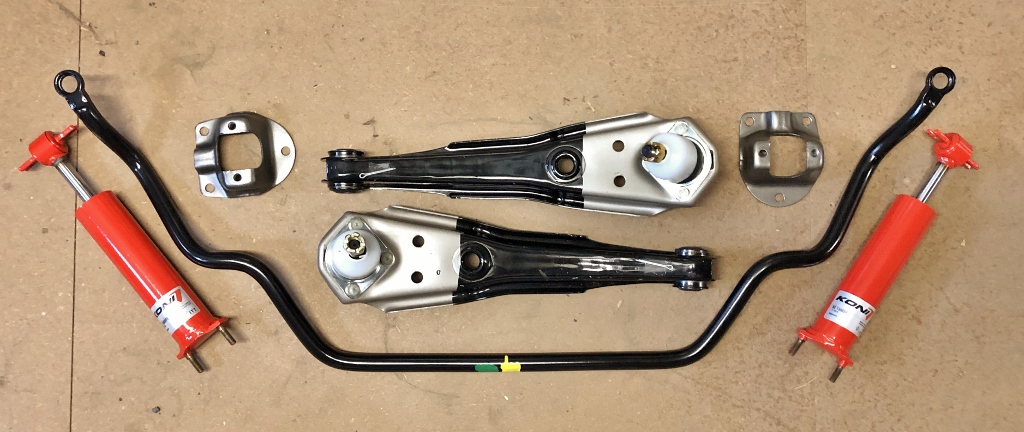
One thing on my mind, with the undersides final painting approaching, is whether or not to fit subframe connectors. I have made the front more rigid with the export brace and Monte Carlo bar, but what about the cabin? (did think about the 1970 Boss 302 bracing plates for the shock towers and the crossmember gussets, but not in my current plans, not factory parts in 68' anyway, although I gather some race ready / home made versions were doing the rounds by late 68').

We all know the connectors have benefits for handling with more "spirited" driving, but I would suggest they might add to accident survivability. These cars come from an early stage in unibody construction for Ford, with no safety cell as such, so perhaps they are worth installing before I paint the underside? Classic mustangs flex a fair bit, but does that mean they aren't strong enough in a serious ding? Any views? Someone here own a 67/68/69/70' that's had it done? Before vs. after views. Feel tighter to drive, etc?

I like the ones that look pretty much like an extension of the factory subframes, not the ones using tubes that hang out below. A popular homemade option is by "Tinman". Plans are below. To me they are more conformal and i like that they use similar sections to the factory subframes. TCP's basic connector set is similar, but sticks out a little more from the look of it and runs $300 USD a set + shipping vs. maybe $40 AUD worth of local steel and some MIG wire etc. (plus a weekends work). BTW none of these compare to a custom made set I saw on the web, (below) but the guy put 70 hours into them and they absolutely hug the car and fit everywhere like a glove. If I decide to fit connectors I imagine I could modify Tinman's plans to do a tidier job. But probably not that good.

Image

Image

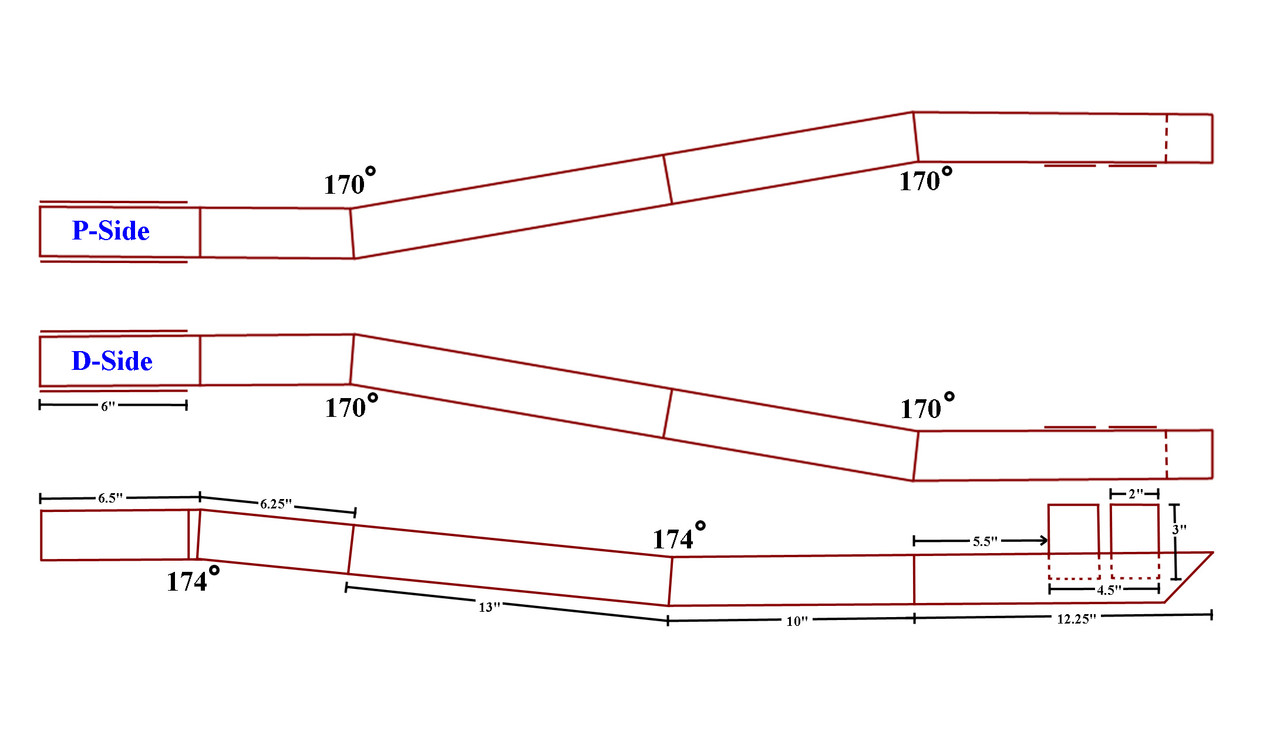
I likem, and would make me feel safer with the kids in the back. Should we get shunted etc. But it is yet more work...
Last edited by mungus on Thu Apr 25, 2019 4:43 am, edited 9 times in total.
Grumpy old git! 68’ S code Fastback
Ausjacko
Mustang King
Mustang King
Posts: 2367
Joined: Tue Aug 03, 2010 7:30 pm
Contact:

Re: Finally - the Bullitt begins! :-)

Post by Ausjacko »

Looks to be some good progress there.

I thought the subframe connectors were supposed to stiffen the chassis to improve handling etc. as opposed to offering more 'protection' in the event of a prang. If you want protection then a crumple zones, like modern car design, is the way to go. Without the chassis stiffeners this is what you have more or less. If you stiffen the chassis then the forces must be dissipated somewhere else- eg. you or your passengers hitting something like the windscreen with their face.
'68 J-code GT Fastback
'67 S-code GT coupe, 'Pink Bitz' formerly known as 'Hookin' up a brother'
'69 M_____ GTS Fastback 'Blasted'
mungus
Mustang Star
Mustang Star
Posts: 523
Joined: Fri Jun 26, 2015 8:53 pm

Re: Finally - the Bullitt begins! :-)

Post by mungus »

Thanks, hope to keep it going...

But yes as I said... Its to improve handling. I simply pondered if they might improve cabin safety as well.

Crumple zones only came in production cars from 1967 with Mercedes, Mustangs didn't get them until the 1970's, instead the whole car collapses around you, (not nice). Crumple zones don't extend into the passenger cabin. The cabin is supposed to be a rigid safety cell and the engine bay or trunk "crumple" around it. There is only flimsy panel steel between the front and rear subframes. so the whole cabin concertinas. Similarly a solid T boning folds a mustang up, as there is little mid cabin strength. A visit to a mustang wrecker in the states a while back was quite sobering in that regard. A roll cage replicates the effect of a safety cell, but at least subframe connectors might create a partial safety cell and allowing the trunk and engine bay to take the decel, and reduce side impact distortion. That's just my guess anyway, and only that.

If I do it for handling gains, a byproduct might be adding increased cabin strength to the safety improvements I'm getting by using modern tyres and 3 point inertia reel seat belts etc. That's all. At least as a 68' GT390 its got a collapsible steering column and dual circuit power disc brakes. Better than drums and a "spear you in the chest" column...

In the end i suppose its all guess work, unless crash testing was done with the subframes fitted (doubt it). I would tender that by the time a crash has crumpled the engine bay up, your head (if not wearing 3 point belts) will be well and truly through the windshield regardless of whether they are fitted or not. But connectors might at least prevent your body being crushed by the weak as piss cabin folding around you. A classic mustang will never be safe by modern standards, but one can perhaps try to maximise what safety opportunities we have.

Perhaps from a handling perspective, the stiffness would be noticeable on the road. I imagine the TQ from my FE will add a bit of twist under load too. But I'll wait to talk to some who've done it and see what they reckon.
Last edited by mungus on Wed Sep 08, 2021 6:10 am, edited 17 times in total.
mungus
Mustang Star
Mustang Star
Posts: 523
Joined: Fri Jun 26, 2015 8:53 pm

Re: Finally - the Bullitt begins! :-)

Post by mungus »

This set of connectors are the ones I mentioned before and IMHO they are just art. Beautifully made, what you would imagine an OEM full set would have looked like. Much more conformal than any aftermarket set I've see, He goes by the name of "buckeyedemon" on the US based vintage mustang forums. He put these connectors on his 500 HP 1970 FB in 2009. I don't aspire to making these for mine, but it goes to show whats possible...

As an aside, chatting to a US based friend today, he pointed out the obvious, in that anyone he knows building a classic mustang race car, that needs an approved cage, starts with a good set of subframe connectors. They form the base of the cage and hence impact safety. In his view a standard classic mustang has little crash safety at all, but a race car with a full cage is fairly crash resistant. And a good set of subframe connectors goes some of the way towards that. So their benefit is more than just handling. Anyway, its all just points of view I guess.

Image
Image
Image
Last edited by mungus on Mon Apr 22, 2019 5:10 am, edited 1 time in total.
Grumpy old git! 68’ S code Fastback
Shaunp
Mustang King
Mustang King
Posts: 4443
Joined: Thu Jul 29, 2010 7:07 pm

Re: Finally - the Bullitt begins! :-)

Post by Shaunp »

Dont worry about the fuel tank, the main reason to close off the boot is so heavy items don't come into the cabin in a crash and kill you, the fire thing is over stated, all local falcons had the same design, up XD, holden were the first here to have steel barrier in HQ and LH torana's, and there tanks are under the car,anyhow, its a cargo barrier really.
mungus
Mustang Star
Mustang Star
Posts: 523
Joined: Fri Jun 26, 2015 8:53 pm

Re: Finally - the Bullitt begins! :-)

Post by mungus »

Ahh OK, good point. Yes I suppose a heavy lump could punch through the rear seat in a ding.

Regardless a sheet metal barrier would serve both purposes I suppose, especially with a wee seal around the perimeter. Looks easy enough to fit really, and probably easily camouflaged if desired.

There's certainly a lot in the old US media about classic mustangs being firetraps.
Grumpy old git! 68’ S code Fastback
Dwayne
Mustang Star
Mustang Star
Posts: 813
Joined: Thu Jun 02, 2016 4:37 am

Re: Finally - the Bullitt begins! :-)

Post by Dwayne »

mungus wrote:Regardless a sheet metal barrier would serve both purposes I suppose, especially with a wee seal around the perimeter.
Probably better off using sikaflex to seal it.
mungus
Mustang Star
Mustang Star
Posts: 523
Joined: Fri Jun 26, 2015 8:53 pm

Re: Finally - the Bullitt begins! :-)

Post by mungus »

Anyway now that I'm up to date threadwise, I'll get into tidying up some little jobs in the engine bay and the underside, and spray her underneath with intergard 2K red oxide, then 2K satin black the front. (perhaps after fitting connectors?) :-)

I'll post back later when I have something to show.

I have to admit it will be tempting as hell to fit out the underside and engine bay, and bolt in the running gear at that stage. But perhaps its better to paint as much as I can before taking her off the rotisserie. Or putting her on dollies to get finish painted and then do the fit out. Logic vs. desire...
Last edited by mungus on Wed Sep 08, 2021 6:12 am, edited 5 times in total.
Grumpy old git! 68’ S code Fastback
Dwayne
Mustang Star
Mustang Star
Posts: 813
Joined: Thu Jun 02, 2016 4:37 am

Re: Finally - the Bullitt begins! :-)

Post by Dwayne »

Are you going to weld up the old upper control arm holes?
Post Reply