Mike's 68

Create your project threads here if you prefer to keep them out of the regular forums

Moderator: Moderators

Post Reply
mikes68
Mustang King
Mustang King
Posts: 3210
Joined: Wed Jul 28, 2010 8:47 pm
Contact:

Mike's 68

Post by mikes68 »

I'm going to start loading up a thread here dedicated to the restoration of my 68 Convertible...

I will insert some previous quotes so as to try and retain some context but obviously I won't be copying everyone elses comments from the other location.

Please don't take any offence if I miss any earlier comments from others - it is just a bit of a task to go through and makes sure I get all the relevent stuff.

I really do hope that this brings some useful information or reference points to anyone who needs it and of course I look forward to all and any feedback, input, comments, flames etc from those in the know... :dance2:
Last edited by mikes68 on Sat Apr 07, 2012 10:43 pm, edited 1 time in total.
Fifty Years Afloat

We can't alter the direction of the wind,
But we can adjust our sails
cage
Mustang King
Mustang King
Posts: 3775
Joined: Fri Jul 30, 2010 1:25 pm
Contact:

Re: Mikes 68

Post by cage »

Bring it on Mike. Lets see it!
"The simple answer is, even if I have decided I still don't know what to do."
hybrid
Mustang King
Mustang King
Posts: 9354
Joined: Tue Jul 27, 2010 2:13 pm
Contact:

Re: Mikes 68

Post by hybrid »

A few of us have done the same.. makes it look like you're talking to yourself without the other replies, but its good to have all the info here anyway.
mikes68
Mustang King
Mustang King
Posts: 3210
Joined: Wed Jul 28, 2010 8:47 pm
Contact:

Re: Mikes 68

Post by mikes68 »

So here we go with the resto... that sounds like it could be a line from a Country and Western song :w

I'm starting this thread to keep as a running sheet of the restoration I am embarking on - there I said it. It's out there and there is no turning back. I'm also running a blog (in my bio) so I am probably going to double up somewhat on the maintenance however I guess this is going to be a much better place to seek out answers to the 1 million questions I'm sure I will need answers to. Thanks in advance to EVERYONE who will respond with advice, comments and feedback.

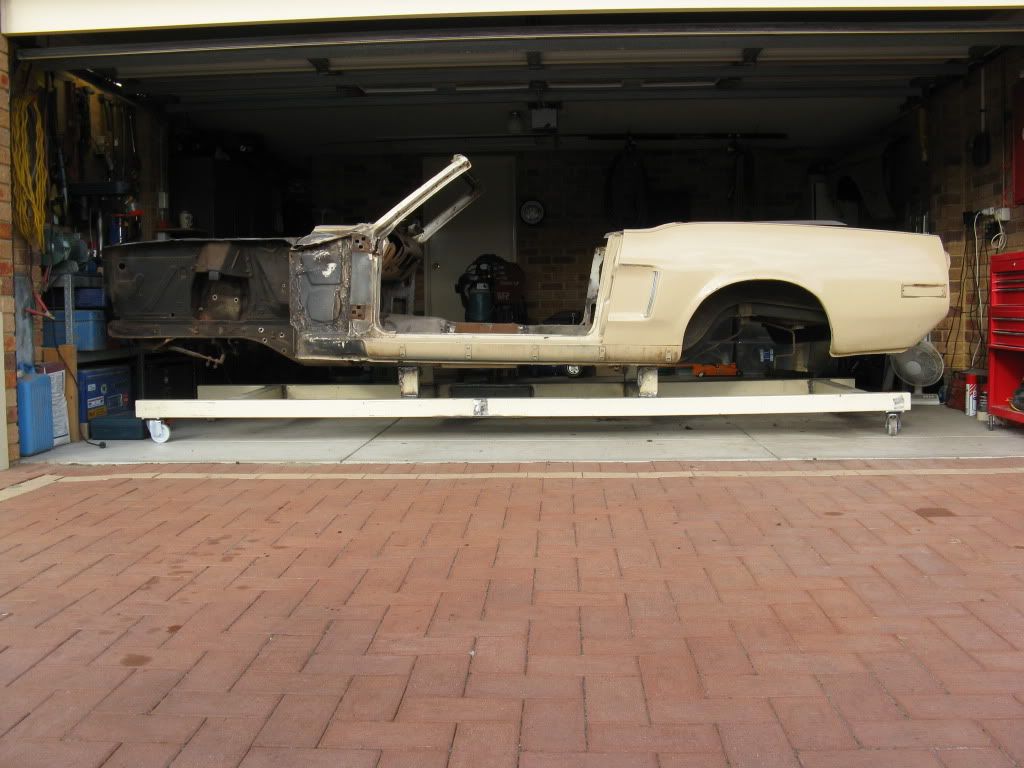
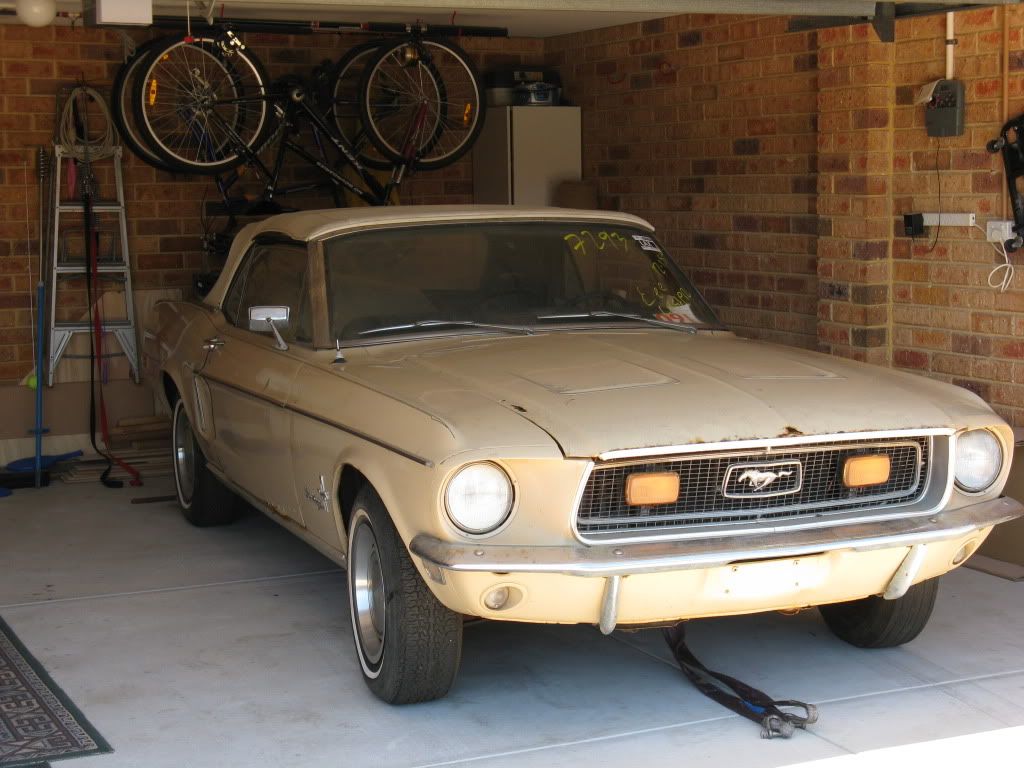
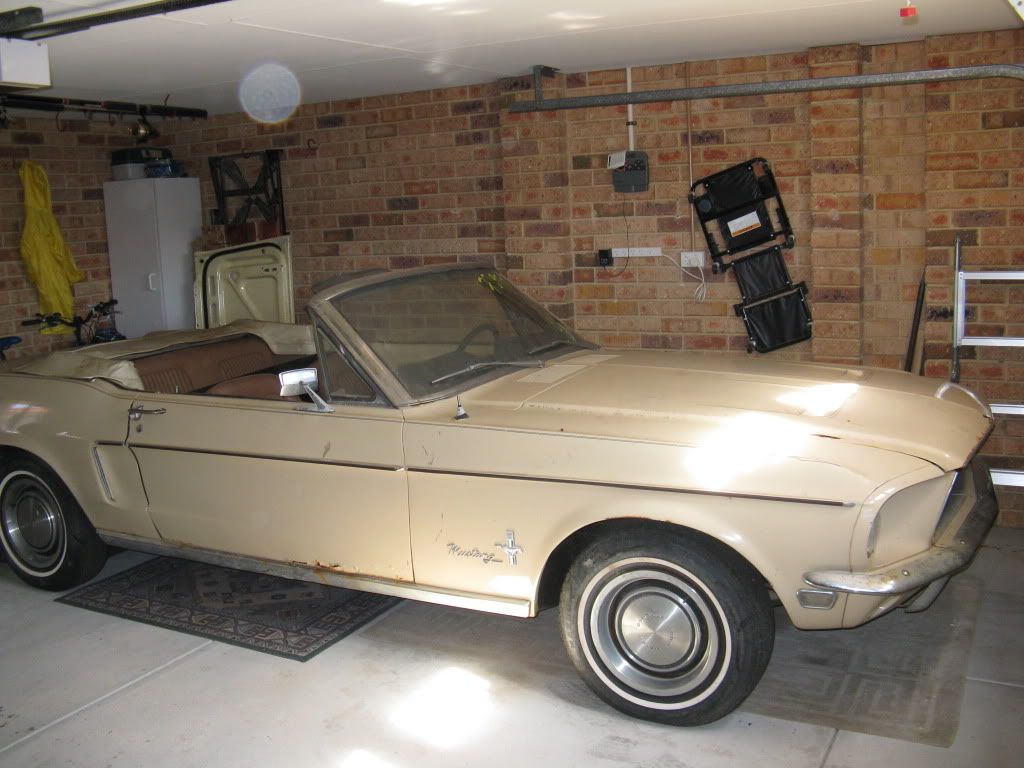
So, as I have uploaded in a previous post, we can see that the pony arrived in its new stable safe and sound.

Image

Image

Of course I couldn't help myself and got stuck into it that first weekend. Actually it was only the Monday afternoon of the long weekend (Labor Day) as I spent the Sat / Sun at a mate's place doing some brick paving around his house to get it ready for sale.

So come Monday night, I was at about this stage...

Image

Image

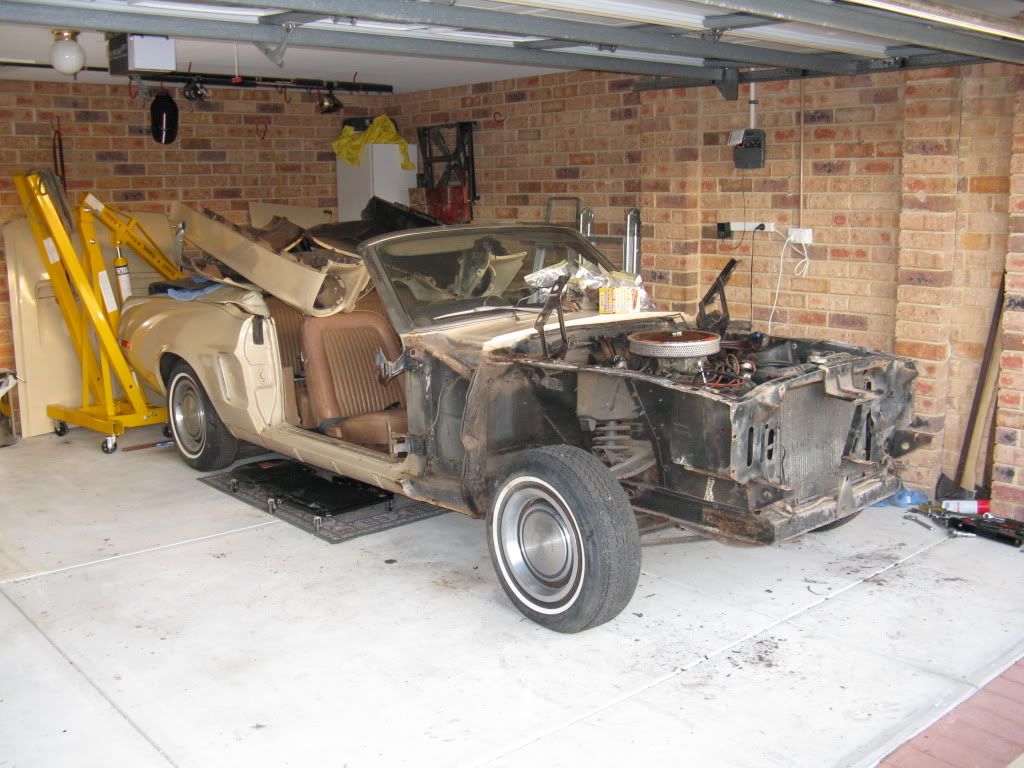
Note the pile of plastic zip-lock bags on the cowl - full of clearly labelled locations for all the nuts and bolts!

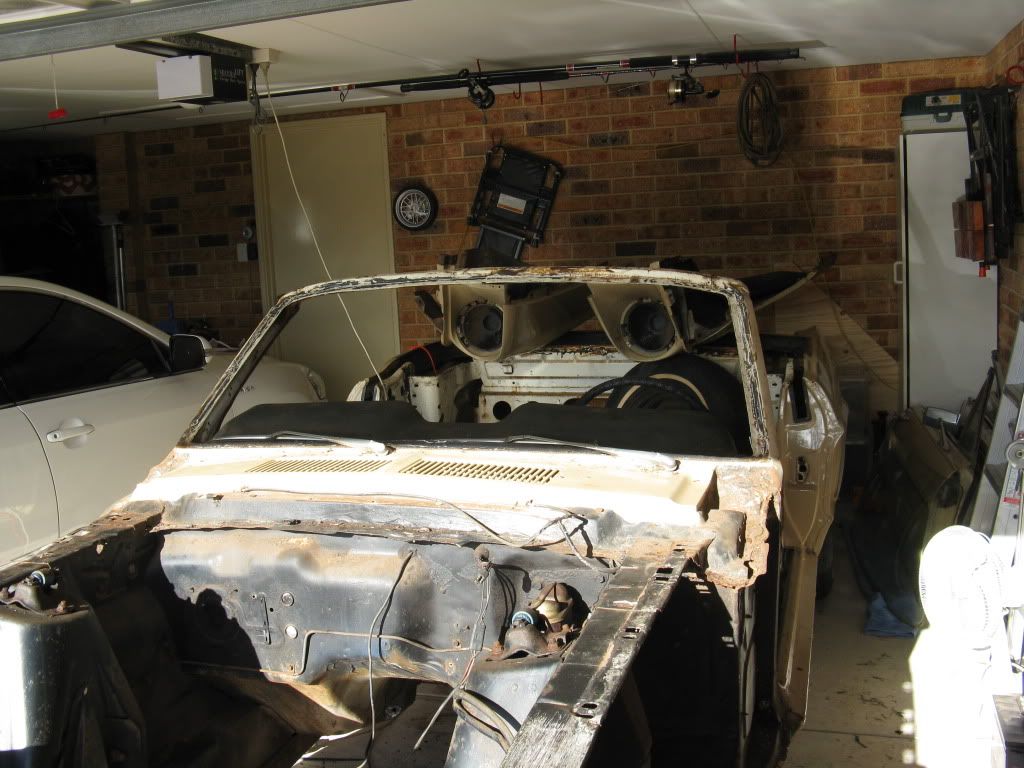
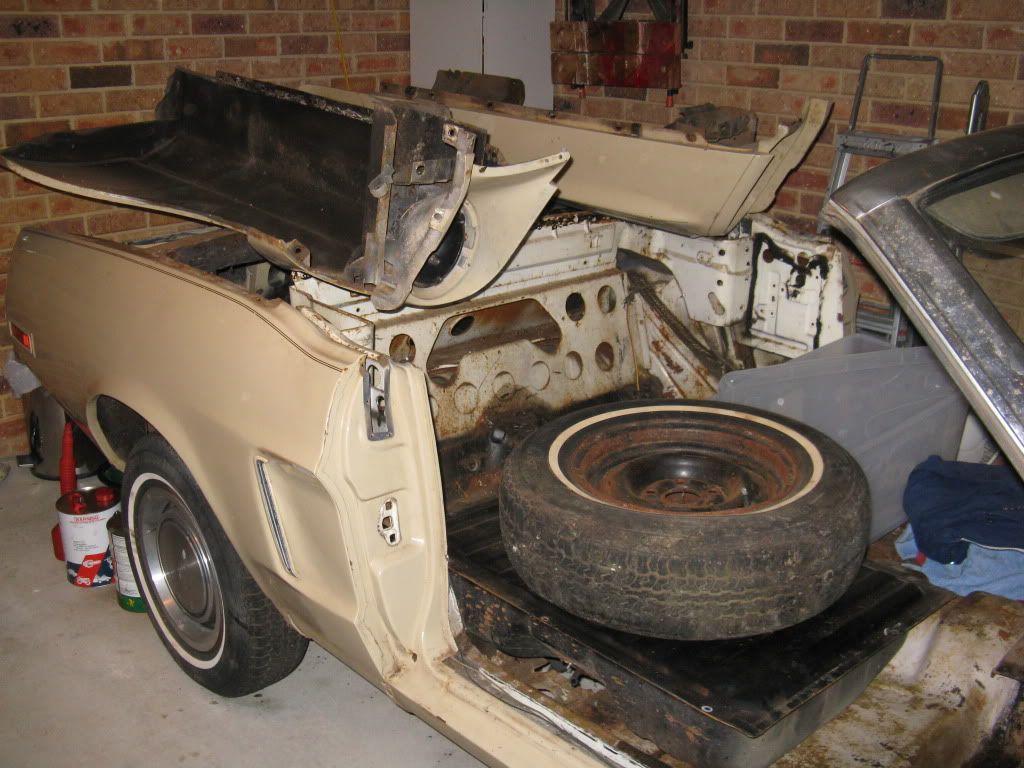
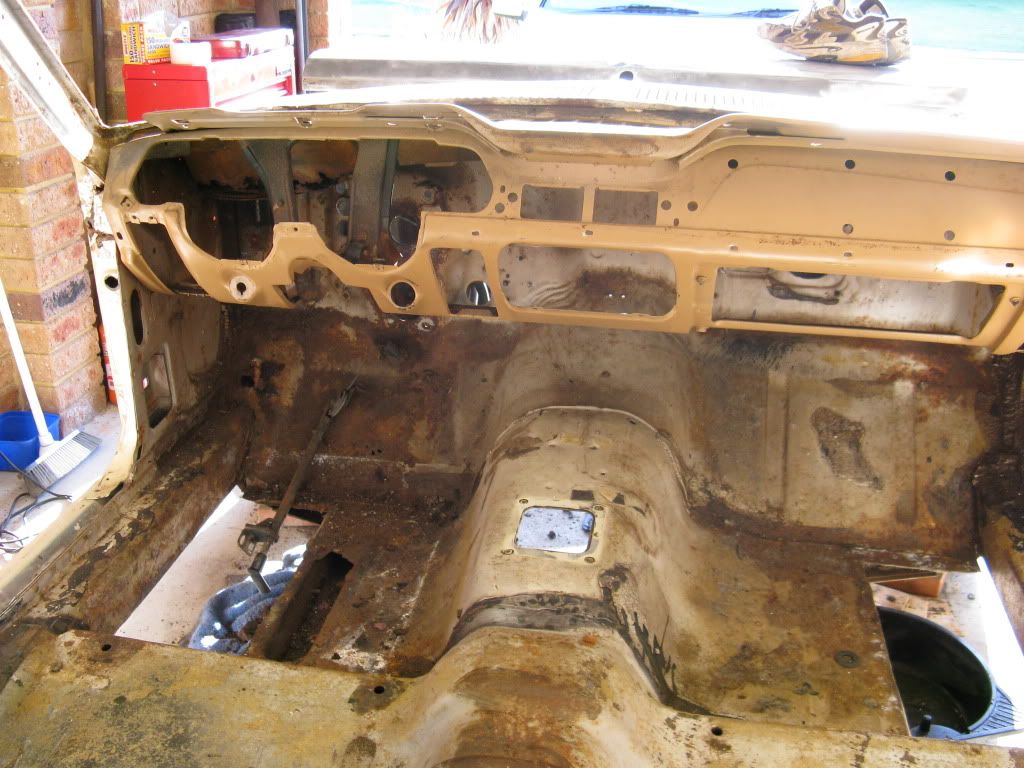
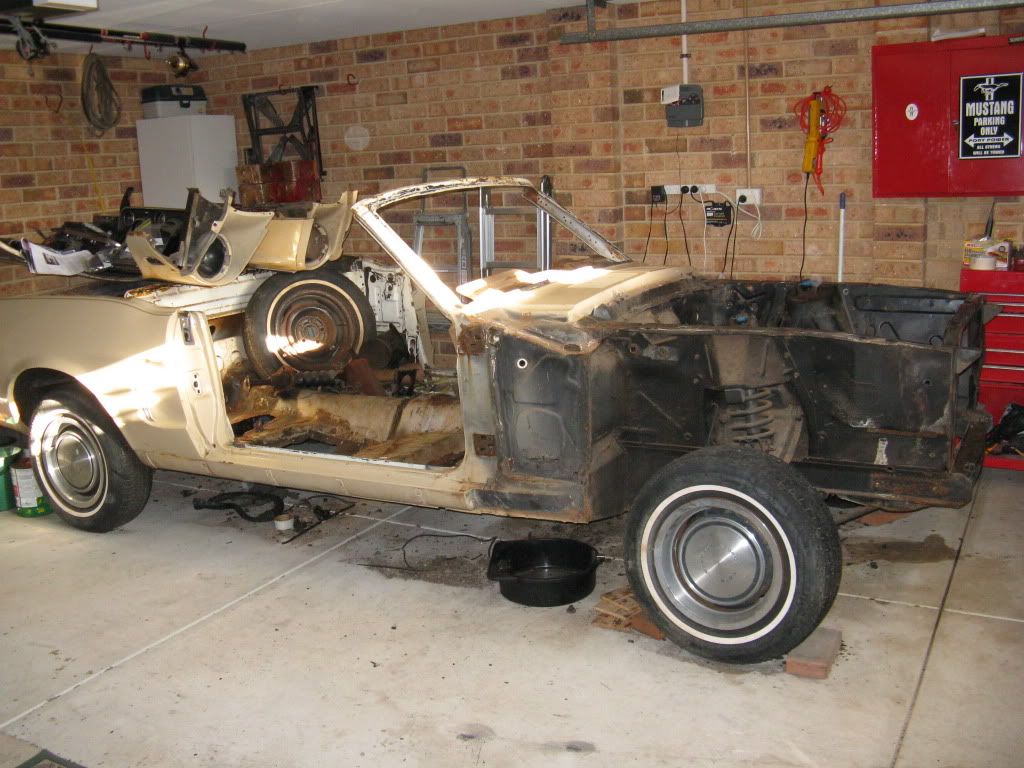
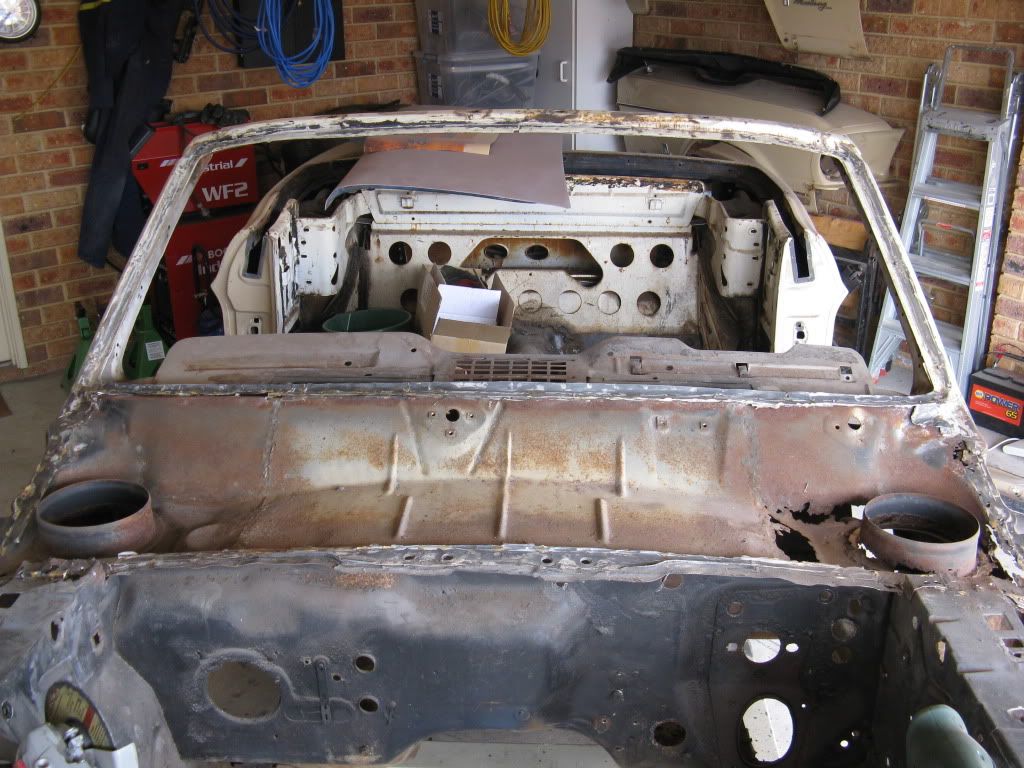
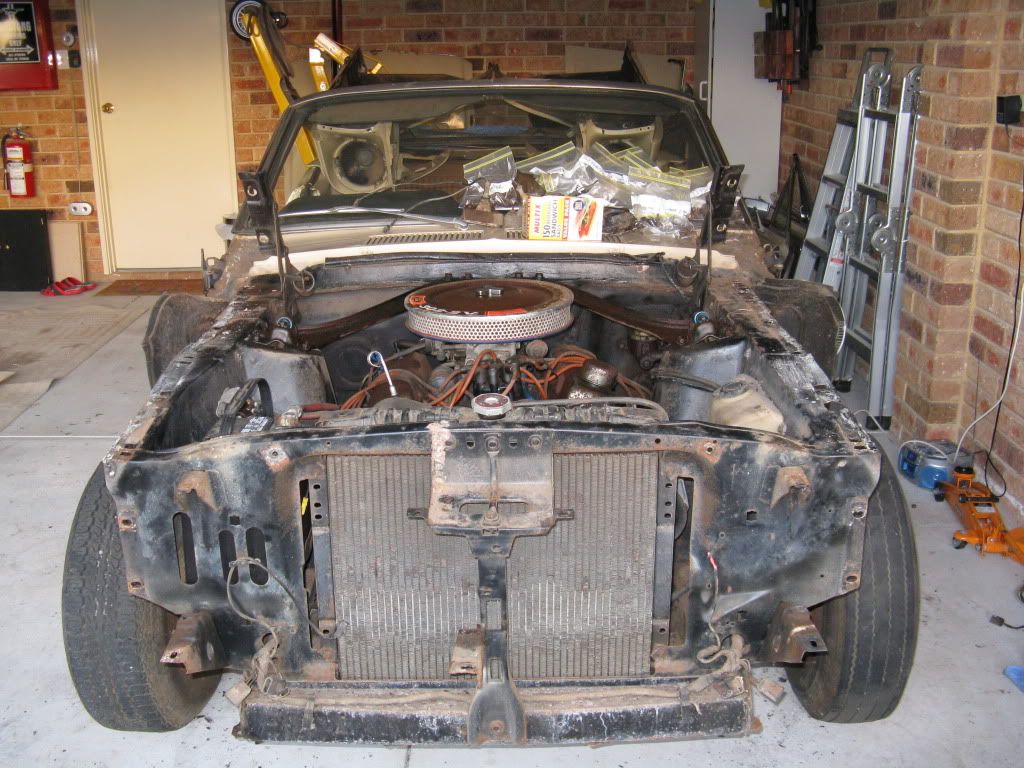
I think around Wednesday night I got to about this stage...

Image

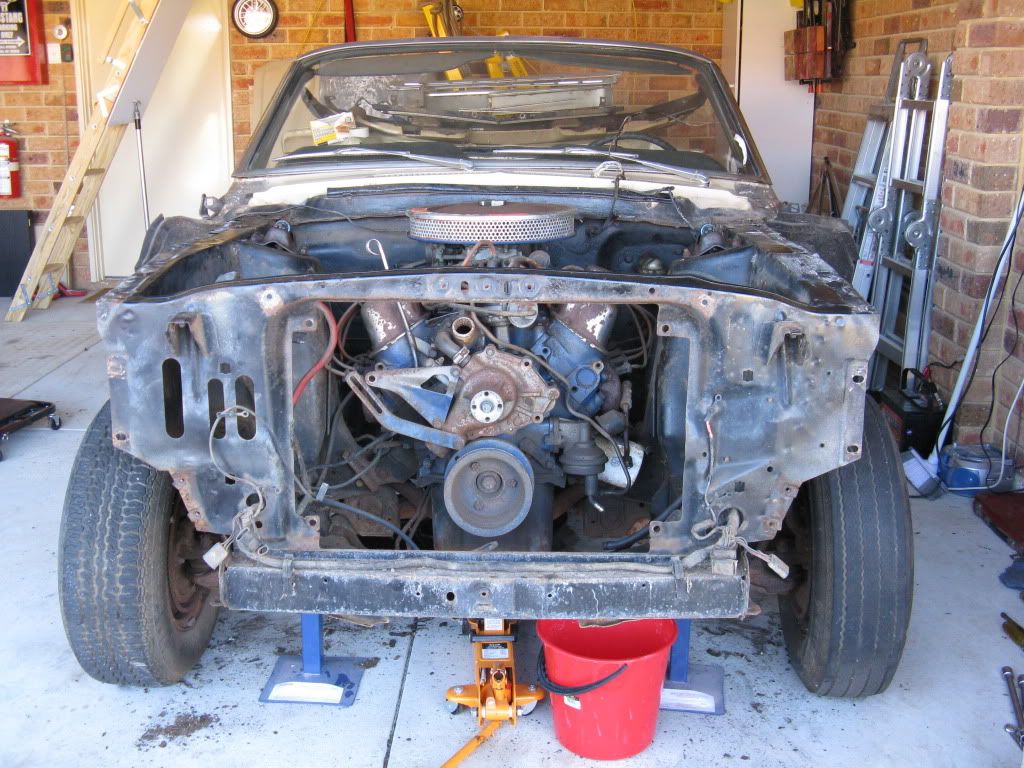
And then by late Saturday...
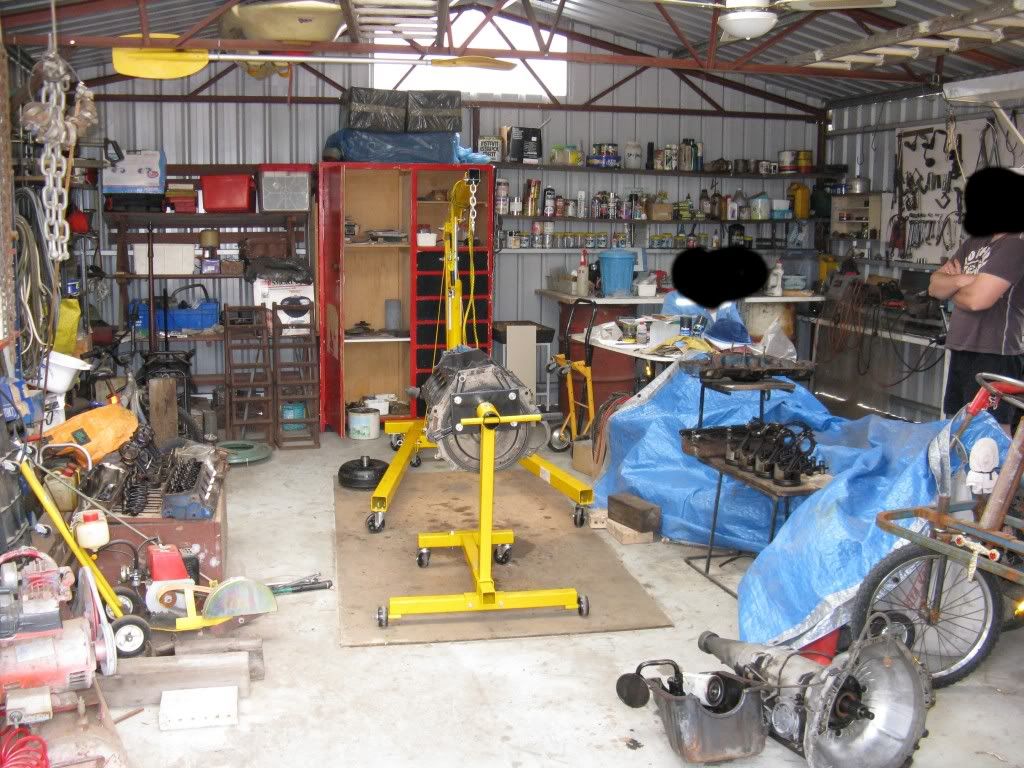
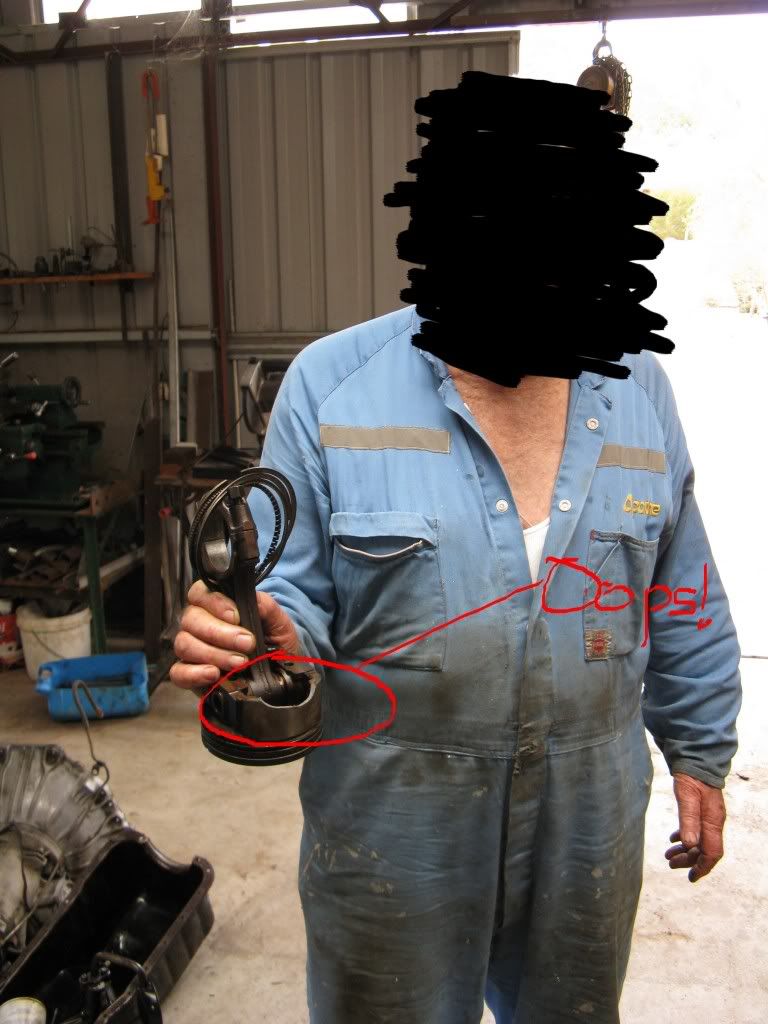
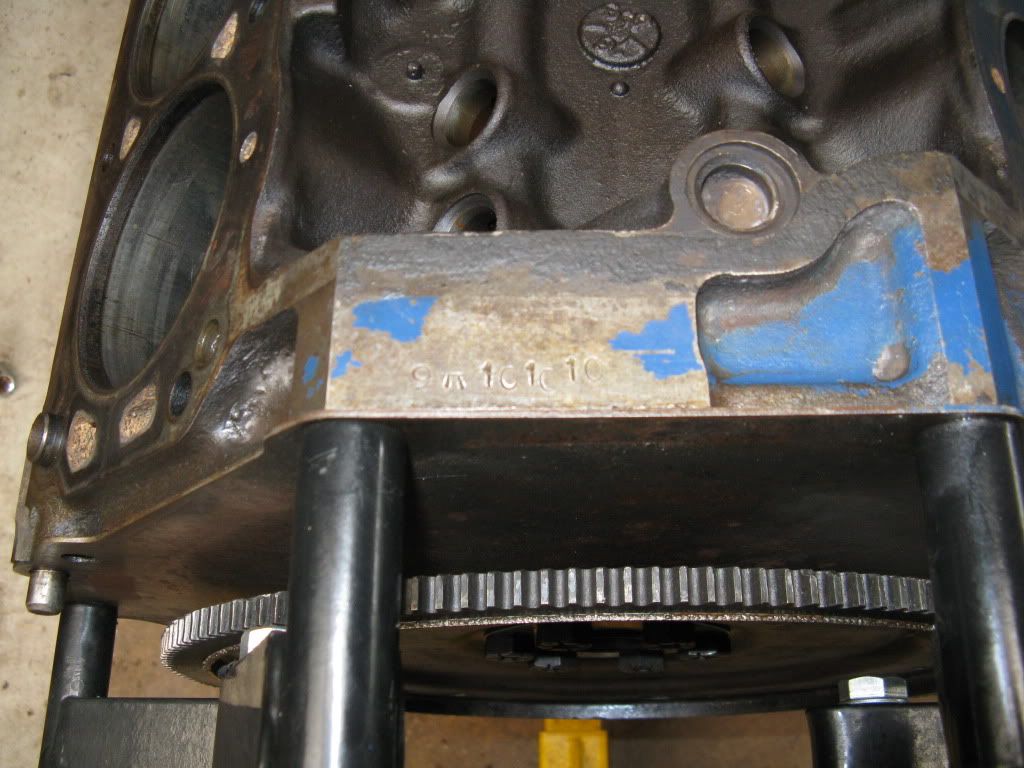
The engine / trans -

Image

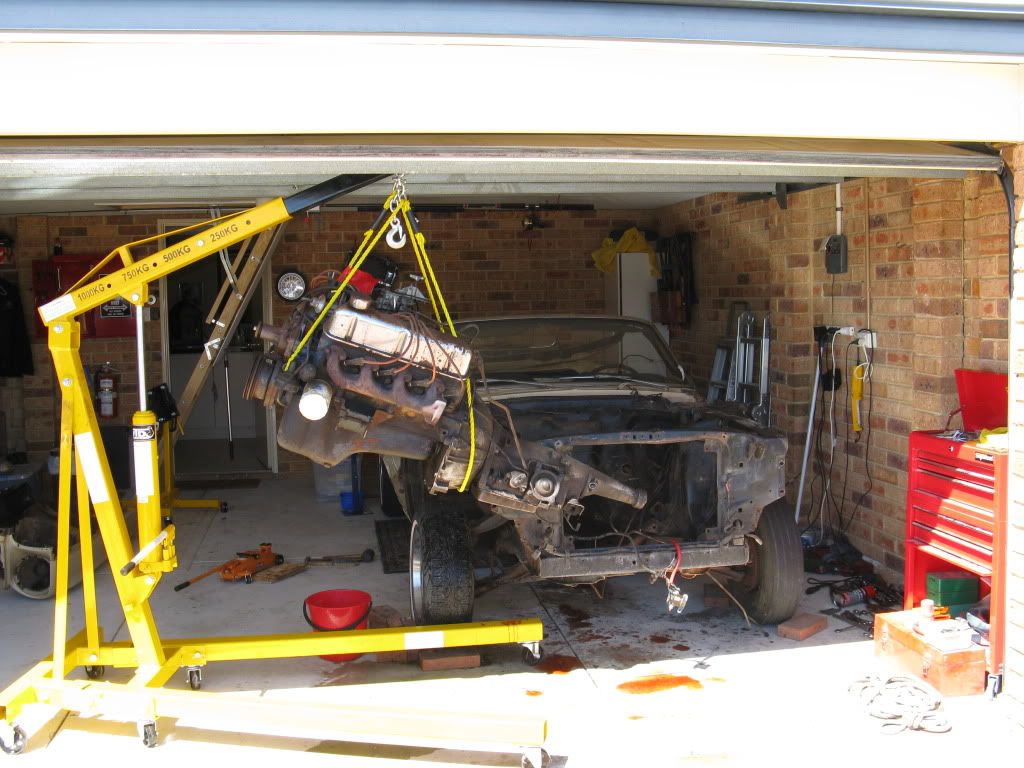
Ooops! Must clean up that oil... I also think it was somewhere about this time that my wife said "how long have we had that big yellow thing?" :w

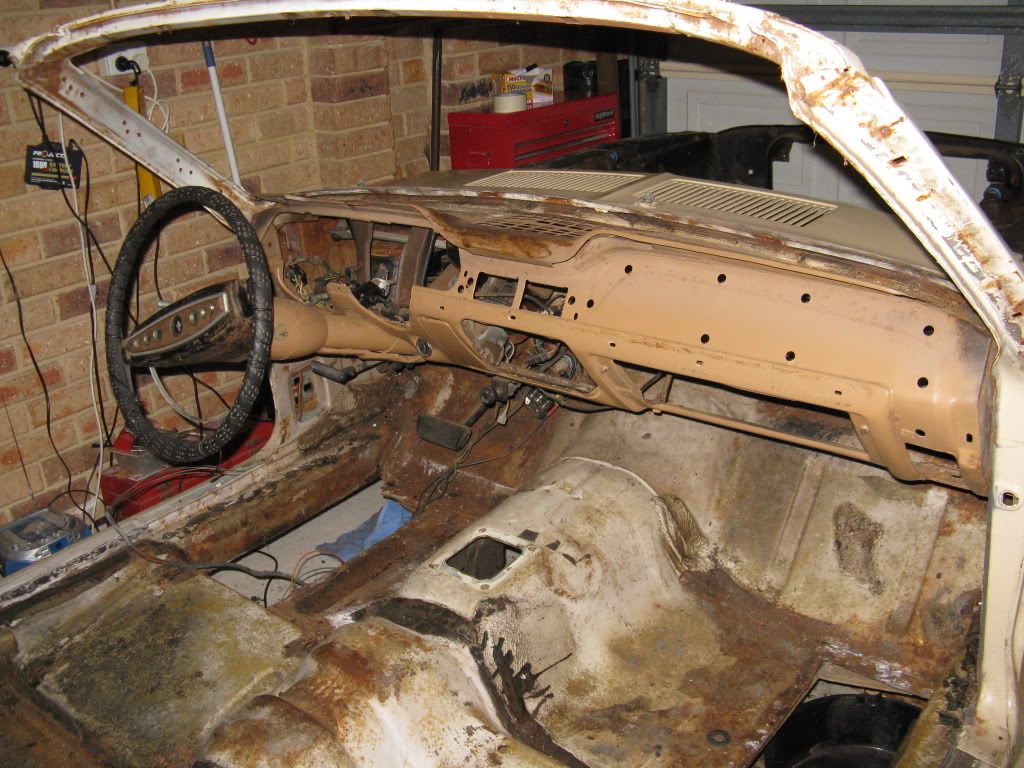
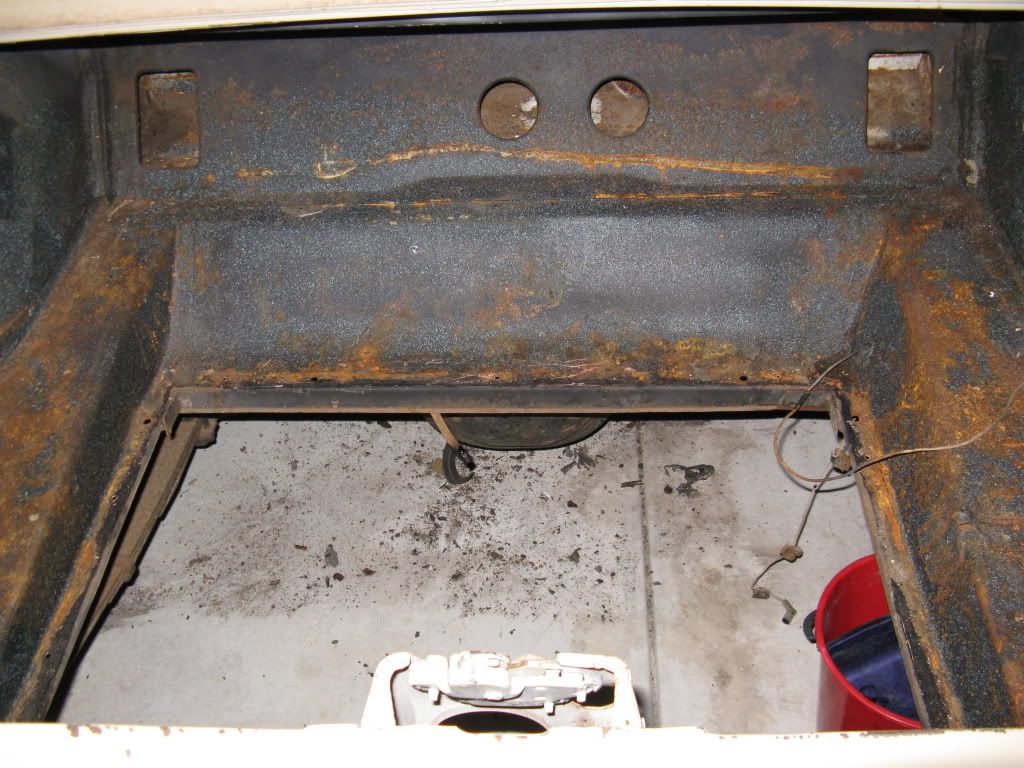
So next was the basic interior (seats, belts, carpet)

Image

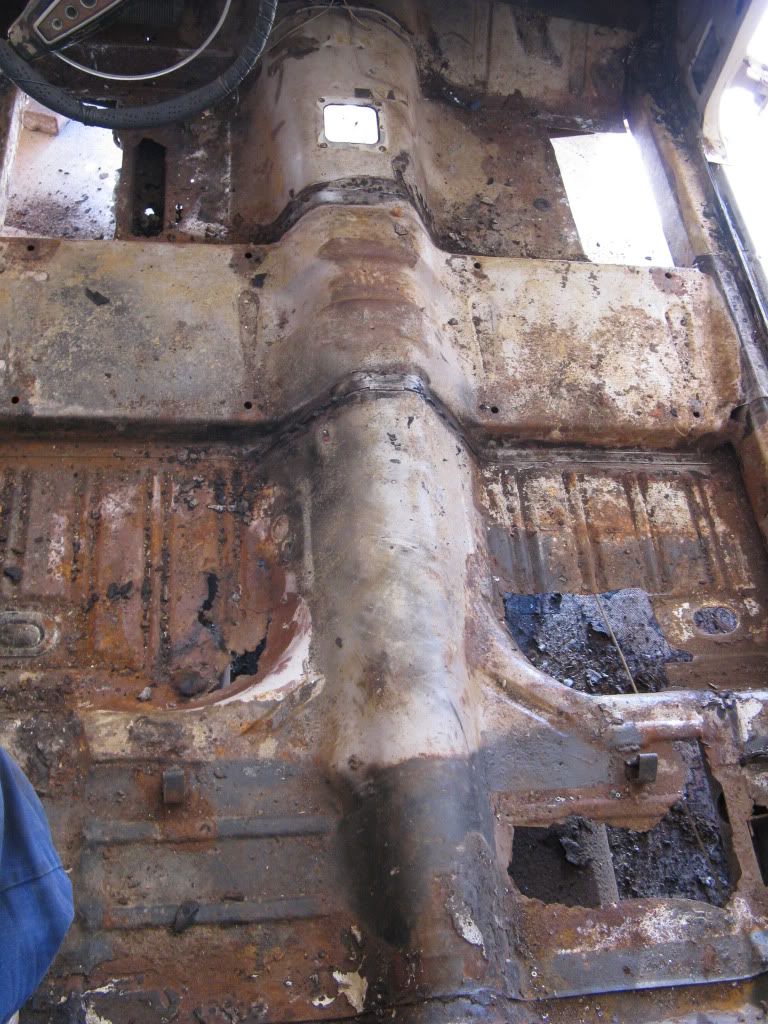
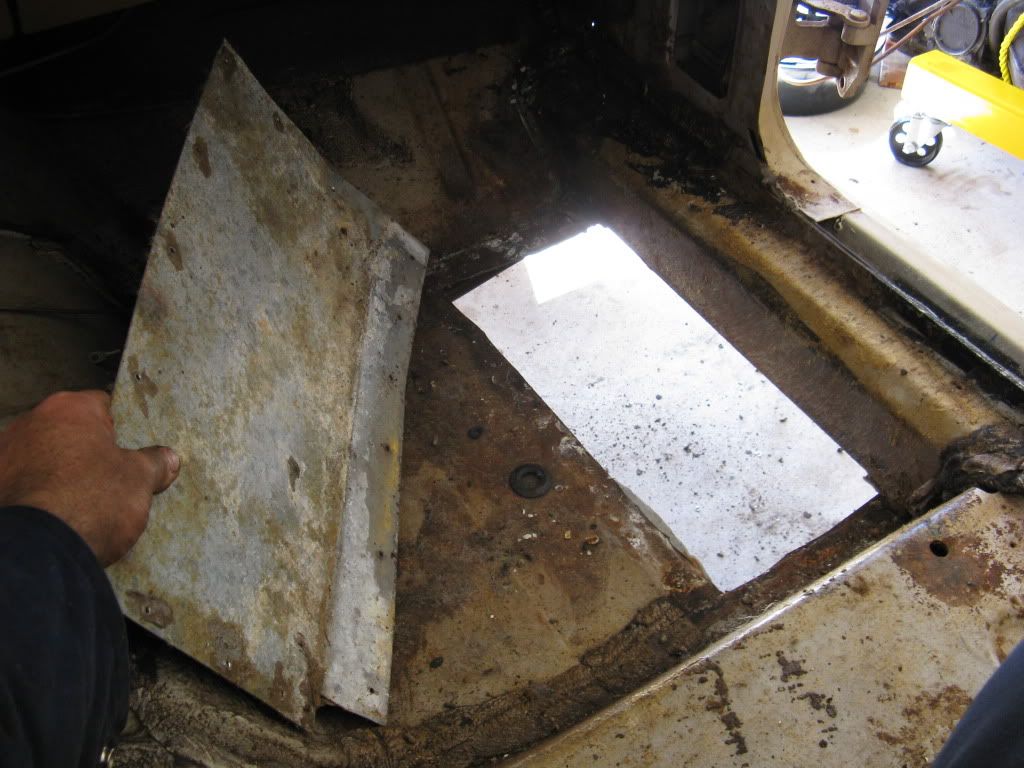
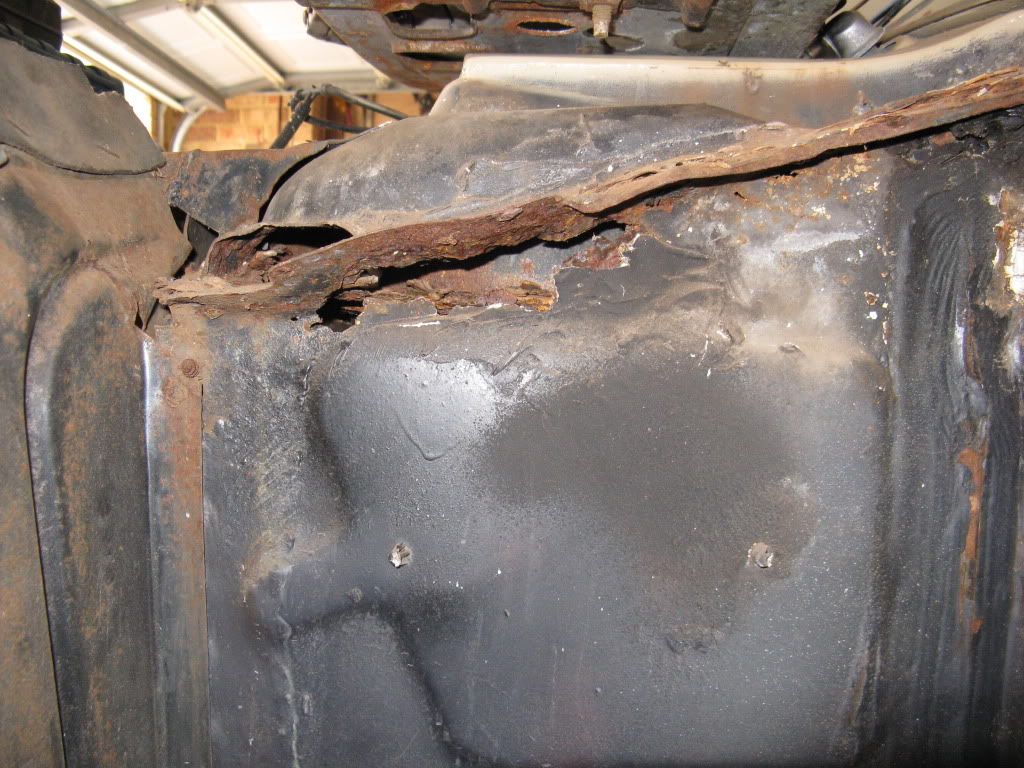
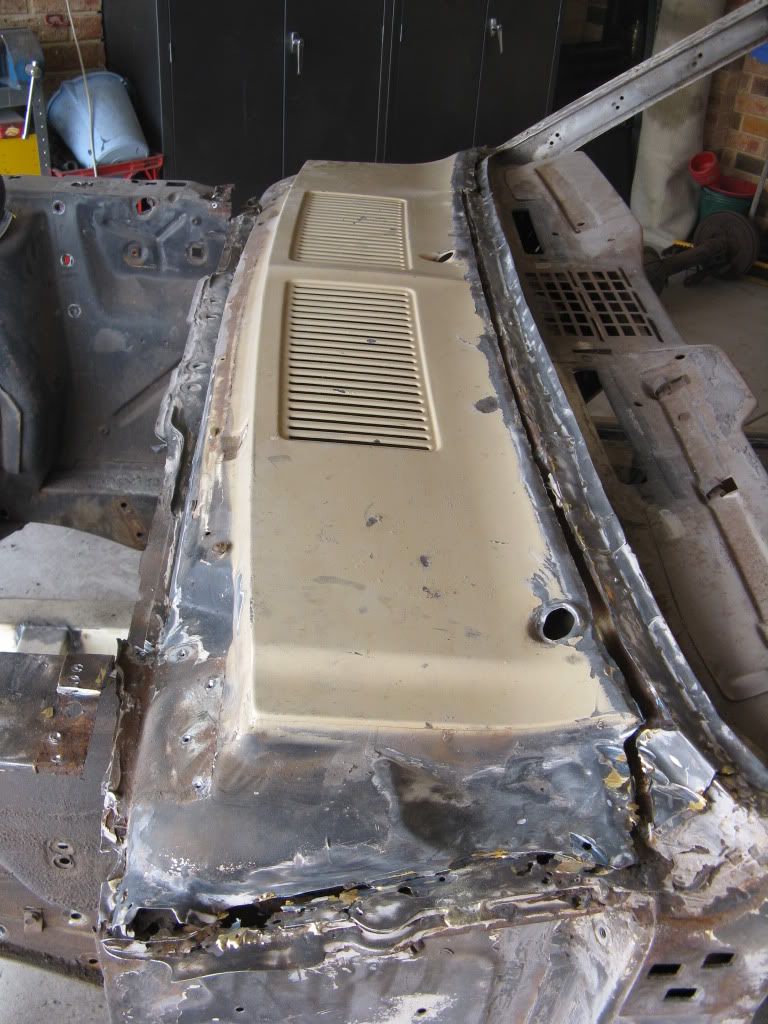
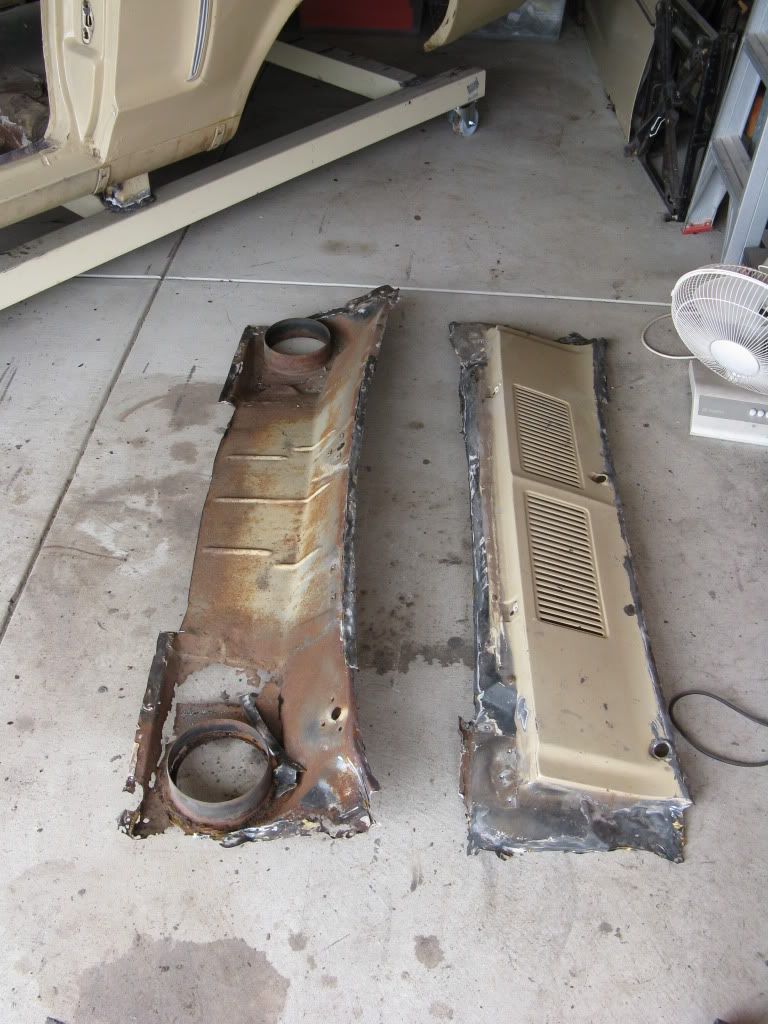
Oh yeah... and all the dodgy panel patches - more on that later.

So, what have I learned so far?

Well, I can comfortably say that I think I have gotten pretty much what I expected. That's not to say that something won't jump up and bite me on the a#se - touch wood - but it is okay so far!

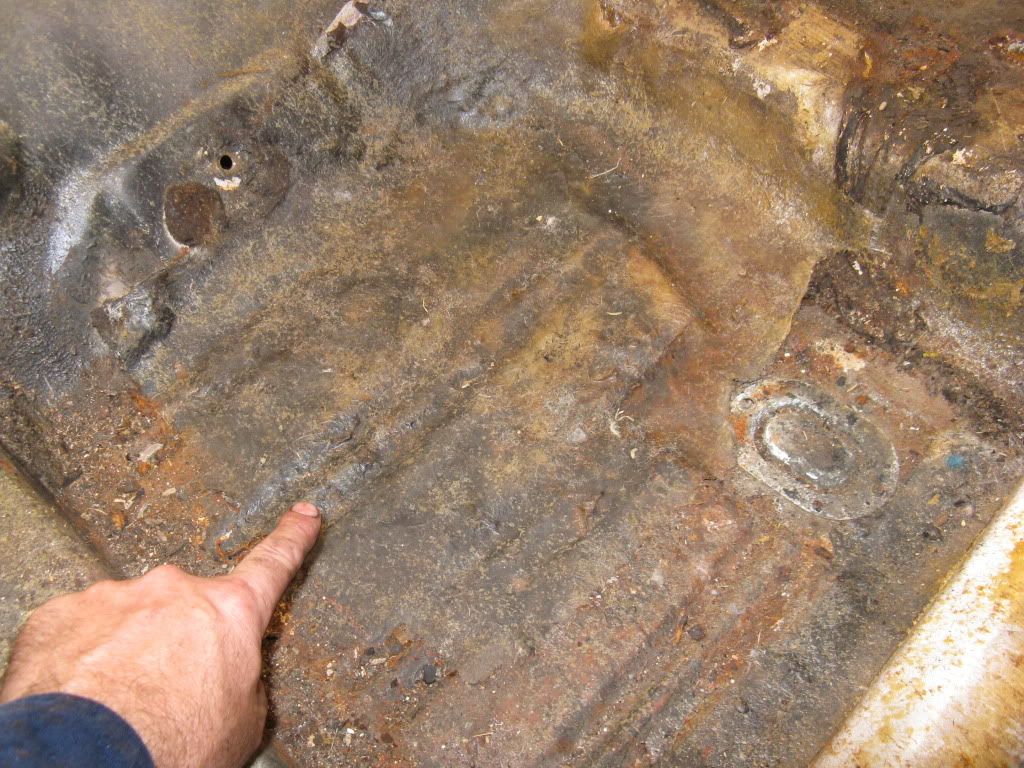
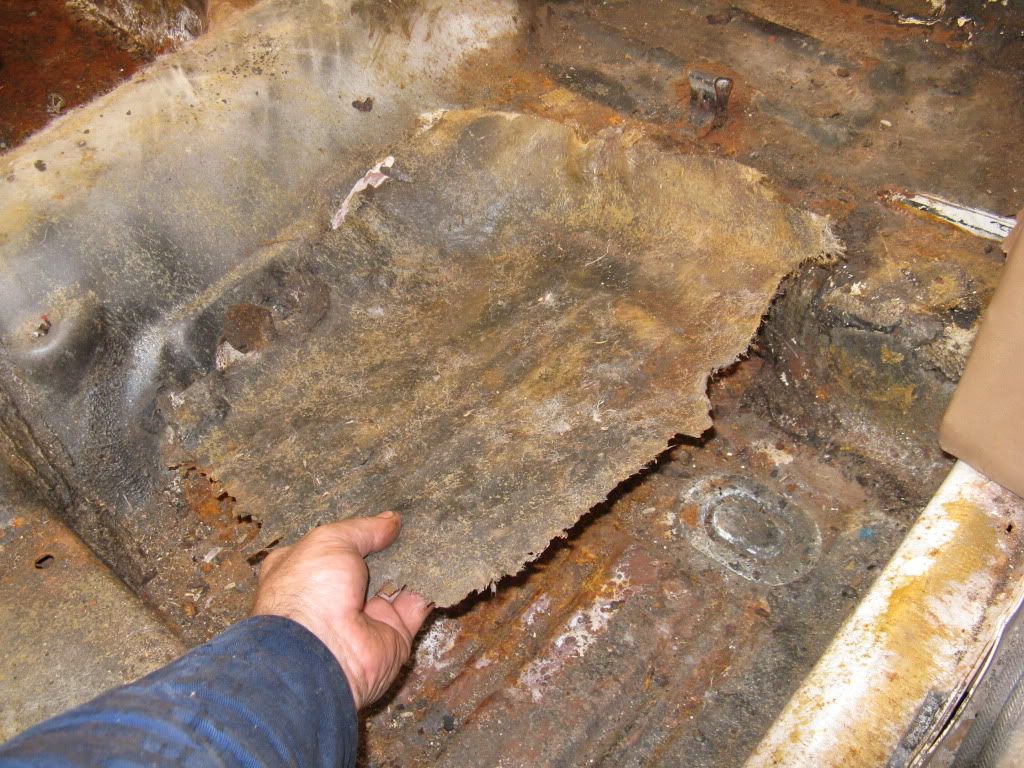
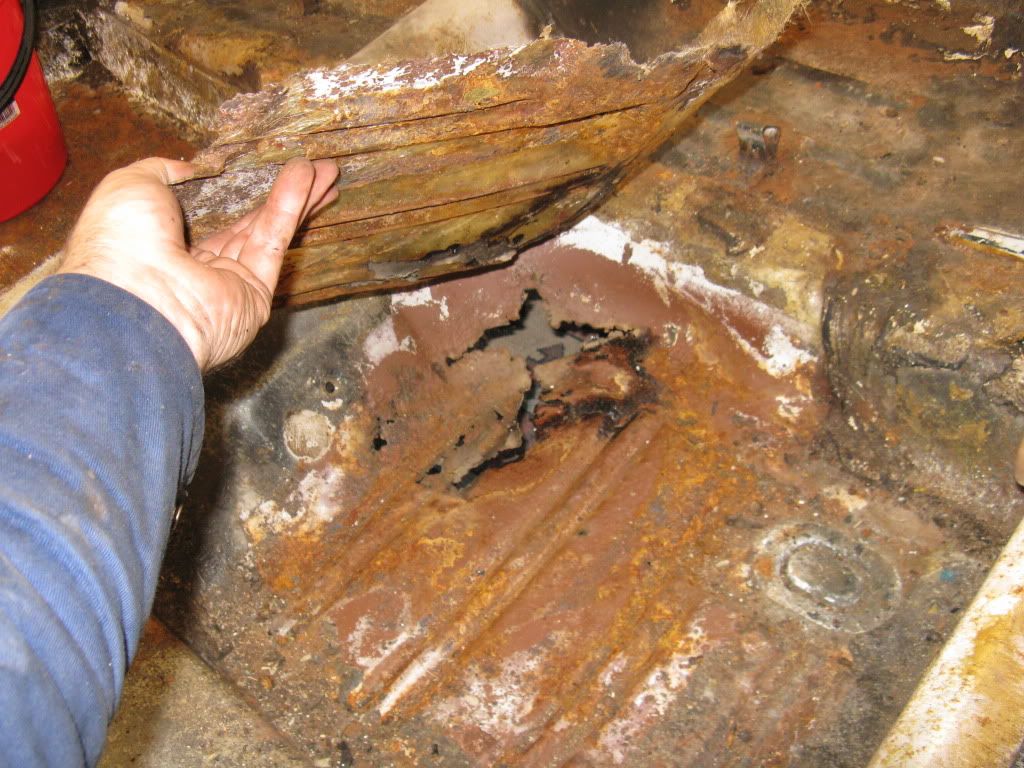
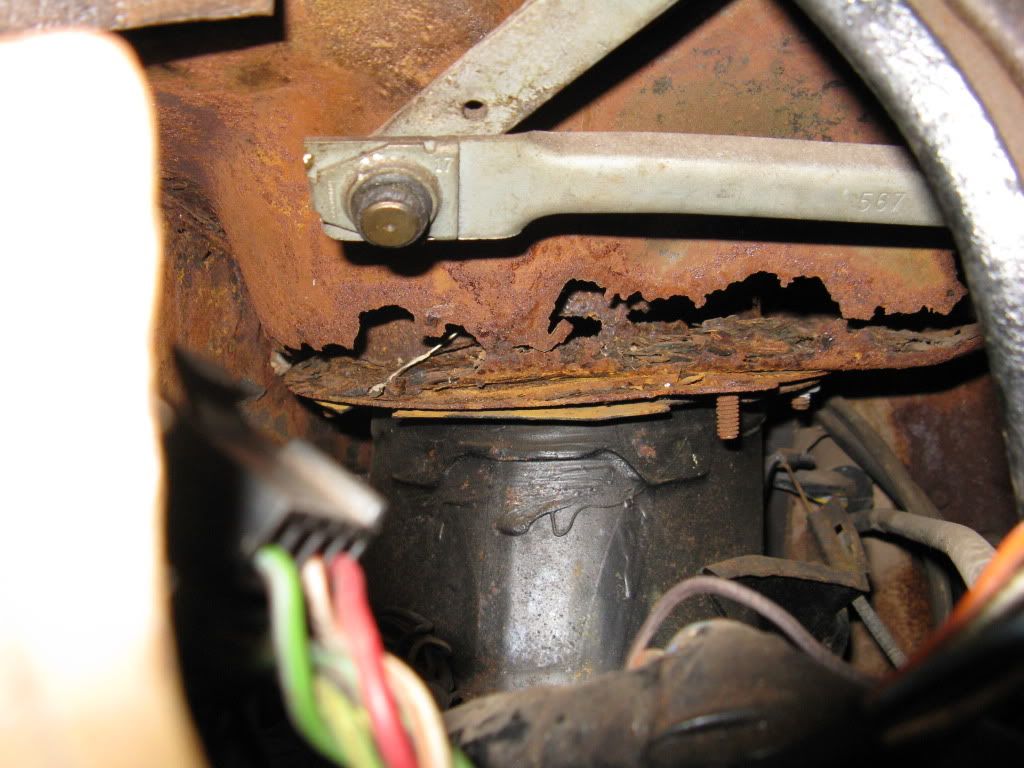
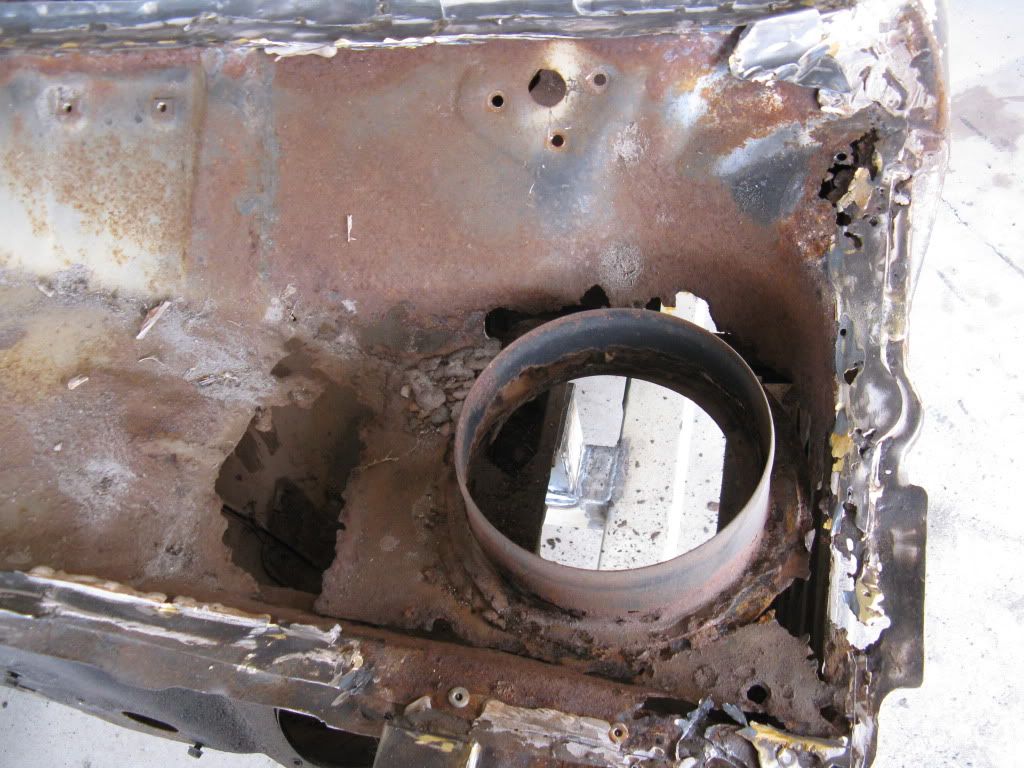
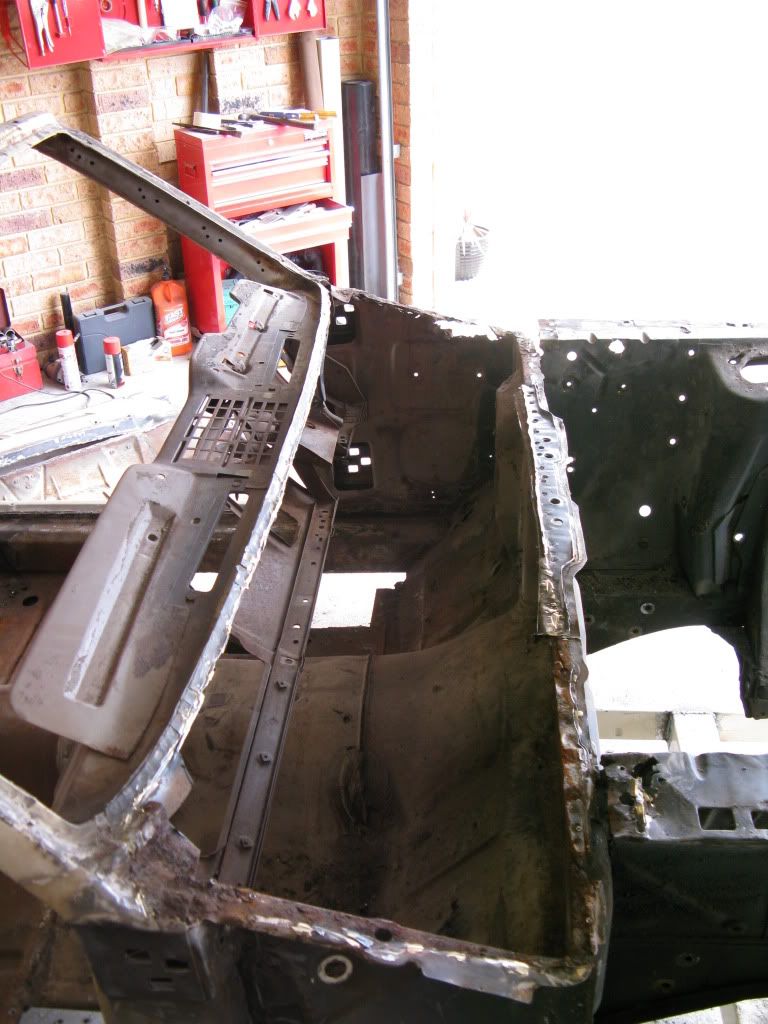
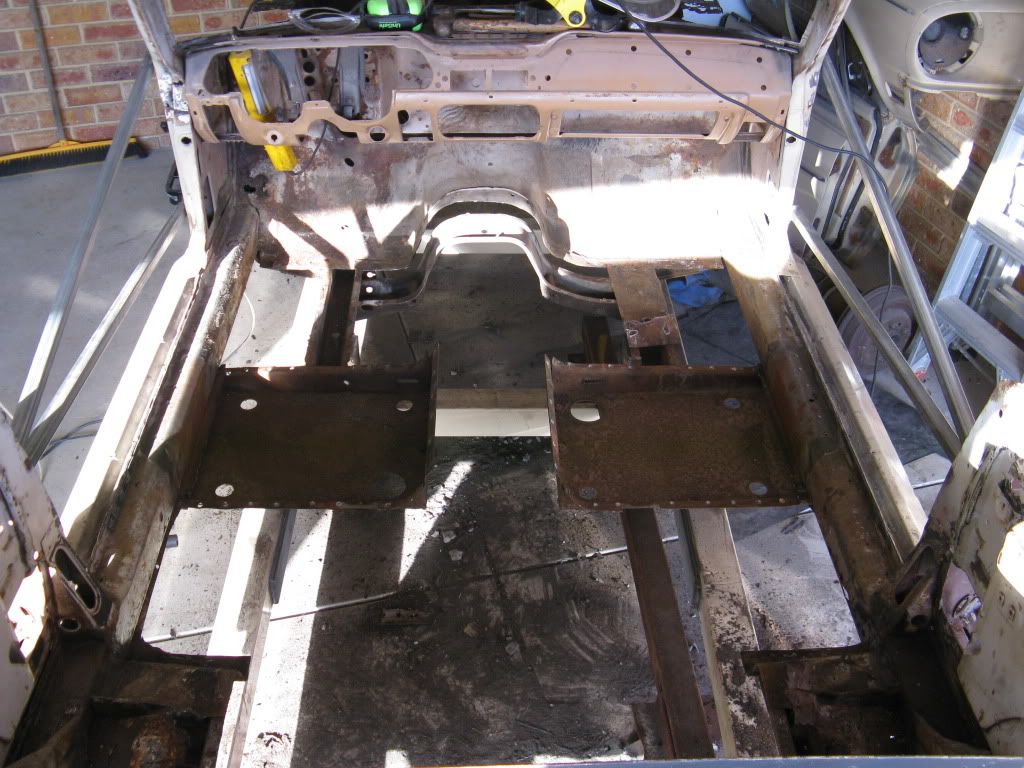
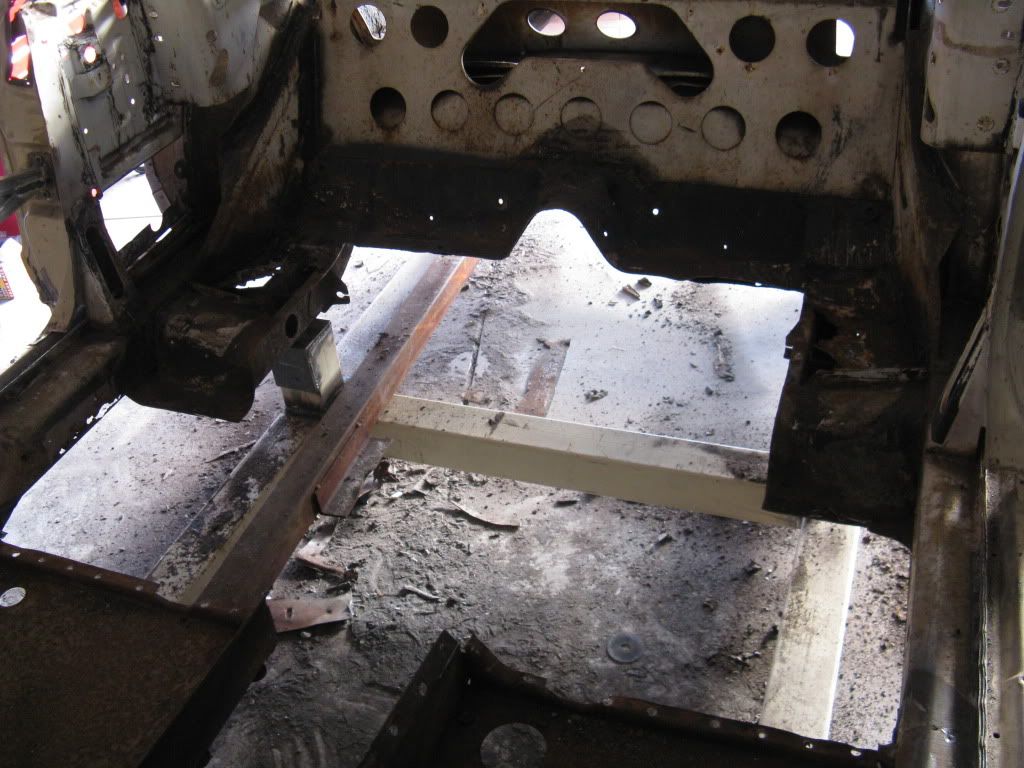
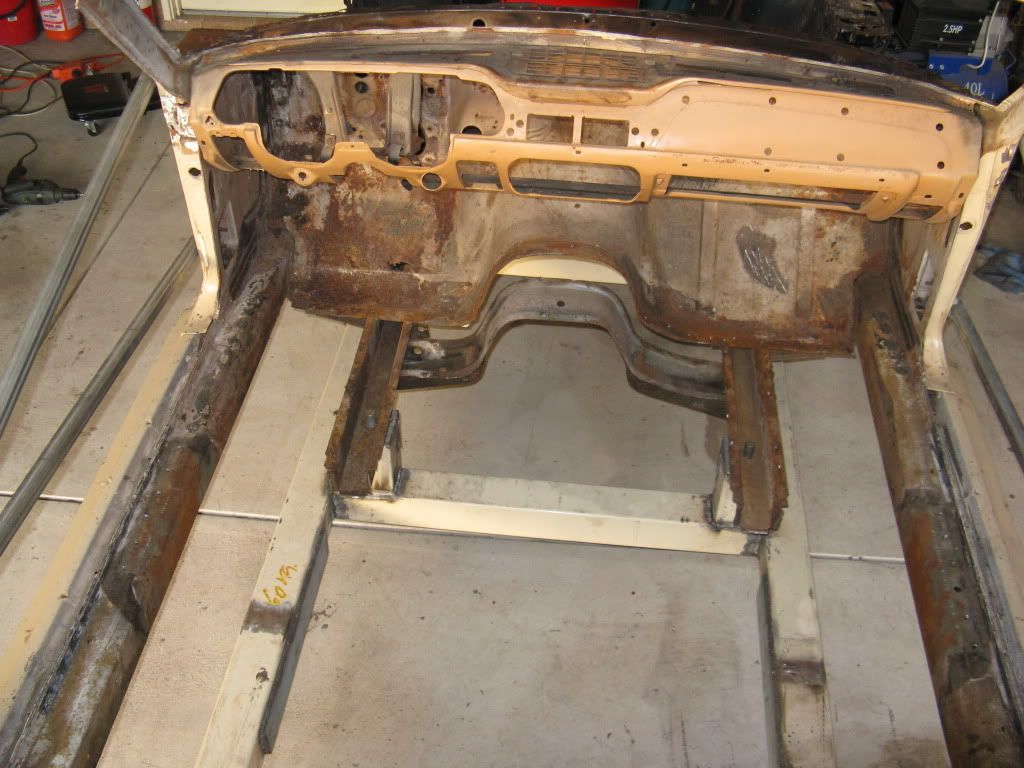
The floor pan, as I have said in an earlier post, is certainly worse than I originally thought however that's not really a problem as I planned on replacing that in any case with the new floor pan already on the way.

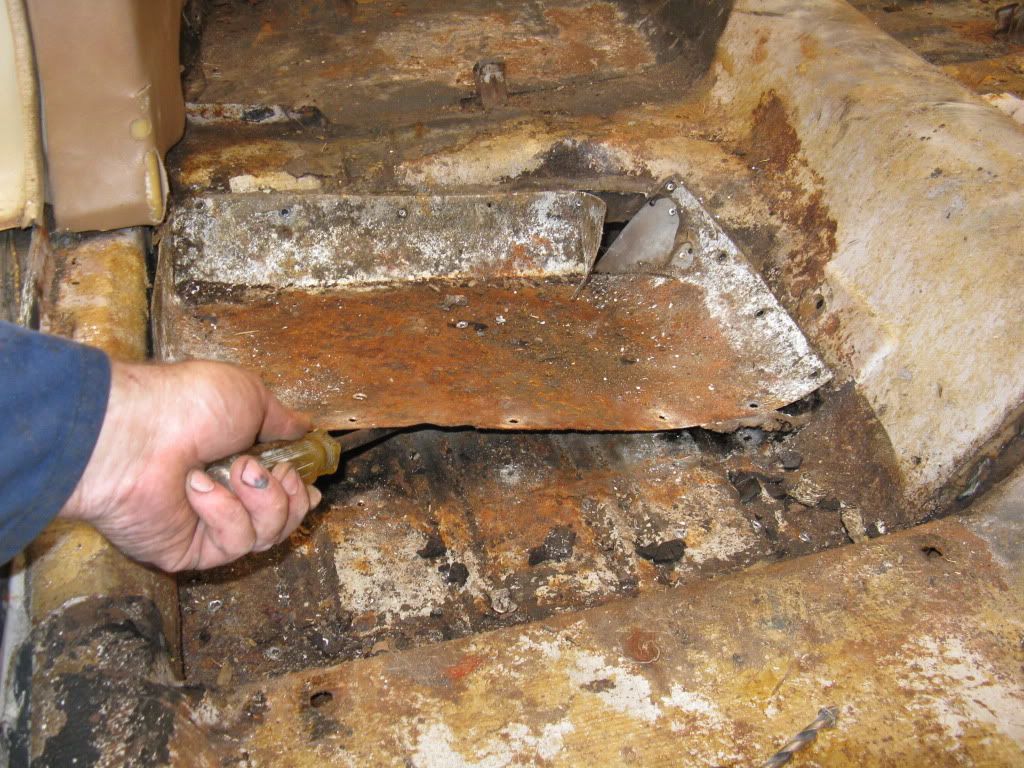
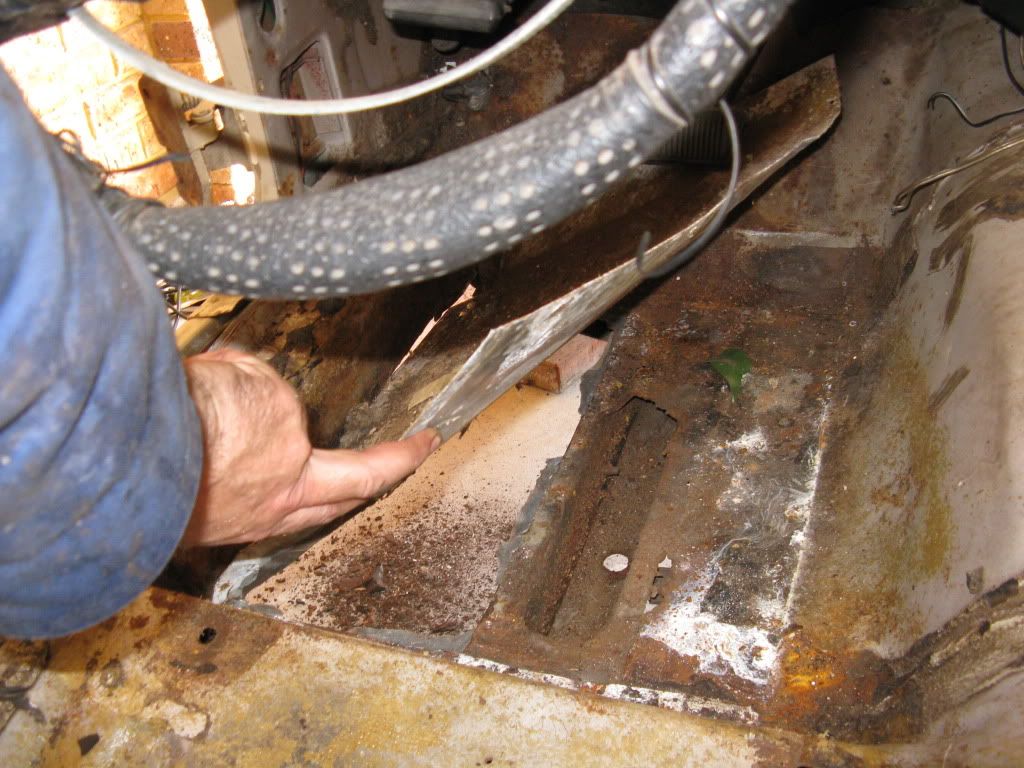
The one thing that I should also have anticipated however is the rockers - well the inner ones at least. I did see some bad enough rust that will warrant me replacing both sides - I may as well do them properly.
Fifty Years Afloat

We can't alter the direction of the wind,
But we can adjust our sails
mikes68
Mustang King
Mustang King
Posts: 3210
Joined: Wed Jul 28, 2010 8:47 pm
Contact:

Re: Mikes 68

Post by mikes68 »

Found a couple of different types of patches. 1 was a fibreglass patch on the driver's side, rear section...

Image

This one just kinda lifted up with a little effort of my fingers

Image

Image

and the rest were a more "traditional" approach - some galvanised plate and rivets... ;x

Image

Image

Image

Image
Fifty Years Afloat

We can't alter the direction of the wind,
But we can adjust our sails
mikes68
Mustang King
Mustang King
Posts: 3210
Joined: Wed Jul 28, 2010 8:47 pm
Contact:

Re: Mikes 68

Post by mikes68 »

So as we know from earlier in this thread I got the engine and trans out last weekend. I took them up to my parents place as Dad has a "real man's" shed (as opposed to my standard, run of the mill garage)...

Image

Well midway through the week, my old man gives me a call and tells me has the entire engine just about completely stipped down... "STREWTH!!" I said... He's gettin' a bit ahead of the curve on me here but he really enjoys this stuff so I'm more than happy for him to get into it. He did have to admit to getting a little over-zealous at one point where he "popped" a piston up with a little to much gusto and it went straight over the top and onto the floor where it broke the skirt... DOH!!!

I'll mask the old man's face to protect, well, ummm, the "not so" innocent...

Image

I got a couple of close ups on the engine cast number and what I think is the serial...

Image

I think this is interpreted as follows:

C8OE-6015A
C - 1960s
8 - 1968
O - class of vehicle fitted to
E - division (engine - as distinct from body, chassis, etc.)
6015 - engine block
A - first revision of this block?


8H17 - The actual build date of the block
8 - 1968
H - August ??
17 - 17th of the month

And I think this is just a serial number... perhaps??

9R010101

Image

I also measured the bore (4" as expected) and the stroke was 3". The car is tagged as a "C" code so unless there was a mix up I guess this is not the original engine. With that said, it is in really good condition. There is a mild lip at the top of the cylinders and they are fairly even in measurements up and down the bores.

There is one mild score down 1 bore. There is absolutley no coke build up in it and the water jacket is as clean as a whistle. Very little play in the valve guides although these will have to be changed out in any case to run on unleaded fuel. Probably a whole lot more I could write up in a more formal report but overall it is in very good condition.

So I spent the rest of today ripping out the convertible top (and hydraulics), the fuel tank, rear valance and some other fiddly little bits.

I will post some more pics of that in a later post...
Last edited by mikes68 on Sun Aug 15, 2010 10:40 pm, edited 1 time in total.
Fifty Years Afloat

We can't alter the direction of the wind,
But we can adjust our sails
mikes68
Mustang King
Mustang King
Posts: 3210
Joined: Wed Jul 28, 2010 8:47 pm
Contact:

Re: Mikes 68

Post by mikes68 »

I got stuck into the windscreen and dash today...

Got the windscreen out in one piece. The rubber seal had deteriorated so I was more than happy to slice it up and just "pop" the glass out

Image

Image

I also got stuck into the dash. Now that is a little fiddly but no major dramas getting it all out... well not all of it but a got chunk is done.

Image

So once I got the instrument cluster out I was able to get a closer look at the lower cowl and all I can say is - thank god I ordered an upper/lower cowl assembly which is on its way.

Image

Image

I also took out the fuel tank yesterday and it looks to be in pretty good condition. No visible rust or corrosion inside and the outside still has the nice black paint - probably a recent enough repro I guess.

Image

I guess this is as a good a place as any to store the petrol tank, spare tyre and fenders...

Image

Still have to remove the steering, suspension, diff, remainder of the under dash stuff and some other little fiddly bits such as engine mounts and whatever other screws and nuts and bolts I come across. I'll get into making the jig then and hopefully it won't be too long after that and my new parts shipment should arrive.

More to follow...
Fifty Years Afloat

We can't alter the direction of the wind,
But we can adjust our sails
mikes68
Mustang King
Mustang King
Posts: 3210
Joined: Wed Jul 28, 2010 8:47 pm
Contact:

Re: Mikes 68

Post by mikes68 »

I have finished removing all the bits and pieces from the dash now. The wiring was a little bit of a pain in the a#se to "unthread" and pull through the firewall although there was probably really no need as I should have just cut it either side of the firewall as it would have been so much quicker. The harness has aged too much to bother about reusing with many cracks and splits in the deteriorated insulation that it would just be a fire hazard waiting to go off...

Image

Removing the light switch ("ahhh yes" I hear the experienced ones say) was a little challenging... until I remembered Alex's blog (http://68vert.blogspot.com/search?q=light+switch) which shows it very clearly. I borrowed the next 2 pics from his site and added the textual explanations.

Image

Image

So this is what the "project" looks like now...

Image

I'm just waiting on the arrival of the steel to make the full body jig and I will rip into the floor pan and rockers.

I'm also trying to find a decent quality and sized spot weld removal tool here locally so I can get into the front seat riser and upper / lower cowel removal. If anyone knows where in Perth they are available then sing out...
Last edited by mikes68 on Sun Aug 15, 2010 10:41 pm, edited 1 time in total.
Fifty Years Afloat

We can't alter the direction of the wind,
But we can adjust our sails
mikes68
Mustang King
Mustang King
Posts: 3210
Joined: Wed Jul 28, 2010 8:47 pm
Contact:

Re: Mikes 68

Post by mikes68 »

Originally posted by Rock65
Wow mike not much left of it!
Hey Rock...

Yeah it's taken me around 36 man-hours to do all of that.

About all I have left to do before I start ripping out the front seat riser and cowel is:

Remove wheels
Remove suspension - front and rear
Engine mounts
Brake lines
Fuel lines
The false air scoop trim
Some other little nuts and bolts sticking in here and there

I am collecting the steel for the "Ozjig" (mkI) this weekend. Gotta pick up a welder and I'll get cracking with that although I may start ripping the front seat riser and cowel before then...
Fifty Years Afloat

We can't alter the direction of the wind,
But we can adjust our sails
mikes68
Mustang King
Mustang King
Posts: 3210
Joined: Wed Jul 28, 2010 8:47 pm
Contact:

Re: Mikes 68

Post by mikes68 »

Dropping the front end off...

Got the front end off yesterday. I couldn't wait for my spring compressor to arrive (about 4 weeks away) so I decided to fashion one up myself. You can see here that I chopped the lower mount off one of the old front shocks, got a length of 10mm threaded rod and locked it on the mount with a nut either side.

Image

It obviously bolts on nicely to it's orginal mounting point on the upper control arm.

Image

I couldn't find a piece of steel plate so I figured that a block of wood (already had the hole drilled and all) should suffice. These springs do have a lot of strength in them but... :+

Image

So more than a few turns on the spanner and you really only need to take the weight of the spring here. No need to compress it up completely so you can undo the nuts holding the base spring plate (what ever that is really called) onto the upper control arm.

Image

Once the two have separated, you may just need to tension up the spring a little more to pull it high enough to allow the bolts to clear the plate.

I undid the upper ball joint and dropped the lower control arm with the stub, drum etc then undid the upper control arm bolts and slipped that out from under the spring.

Then just wound down the tension on the spring and voila... the front end is off.

Mount it up on the jig...

I spent most of today getting the jig ready to take the weight of the remants of the car...

I'm quite pleased that I got this done as it was just sitting (teatering) on bricks and some jack stands :* which kinda made me a little nervous - oh to have a fully kitted out workshop with hoists and all that good gear.

Image

There was about 8mm sag in the middle - I may get a 3rd set of wheels ($30.00 each) to prop that up.

Image

I still have the forward and rear props to put in but the actual load bearing is done on the original factory jig points - thanks Kerry for the original pics which this is based on.

Image

These wheels are rated up to 300kg each and are 100mm wheels. I must admit that I did not expect this to be so damned easy to push around. Very little effort indeed.

I suggested to my wife that I liked it across the middle of the garage and that her car may have to stay outside for the night - to which she replied "that's okay, just move your sleeping bag out there next to it as well then..." :w

She is such a comedian...
Last edited by mikes68 on Sun Aug 15, 2010 10:41 pm, edited 1 time in total.
Fifty Years Afloat

We can't alter the direction of the wind,
But we can adjust our sails
mikes68
Mustang King
Mustang King
Posts: 3210
Joined: Wed Jul 28, 2010 8:47 pm
Contact:

Re: Mikes 68

Post by mikes68 »

There is / was so much bondo, rivets and brazing done to this in some half a@rsed attempt at an earlier restoration that there was no way I was going to even consider salvaging this area of the car. The driver's vent had completely rusted out and the upper cowl had been stitched in place with braze and filled up with bondo all around the outer folds - no, not the actual seams but the final folds going out to the seams. I took to the brazing with a grinder (both cutting and grinding wheels at various times). Of the probably 150 to 200 original spot welds that actually hold these in place there was perhaps 1 third of that number in brazing welds so the removal of the top cowl was relatively pain free.

Although the actual top edge of the cowl is spot welded to the lower part of the windscreen you can see in the picture below that I have cut along the lower fold. This was actually already done and stitched in with bronze welding so it was very quick to slice it open along there again. I will of course have to set about grinding back and removing that lower windscreen sill at a later stage.

Image

You can see how badly the driver's cowl is rusted out in the picture below. Maybe if that was all that was wrong I would consider a patch. The centre and passenger side sections are reasonably good however it is all the crap stitching that was done around the edges that really has me happy with the decision to do a complete replacement. That was another item I took a punt on when ordering a bunch of parts so the upper and lower cowl assemblies should arrive in about 4 weeks.

Image

I took much the same approach with the removal of the lower cowl as was done with the upper section. Again it was difficult to discriminate what was the lower cowl and what was either the top of the firewall or cowl side panel and it was again mostly bronze welded in place with an enormous amount of bondo filling the gaps.

Image

It may be a little difficult to see in the picture below but I ended up cutting inside the folded lip of the lower cowl (just inside the top of the firewall). It was easier than competing with the spot welds and the brazing so I will take to that 2 foot strip with a grinder later to tidy that up.

Image

Here's the left overs.. waiting for the scrap heap. I will probably keep them around to completion as there would be some good clean metal that may be used in some patches elsewhere later on...

Image


Well, it has been a busy Easter weekend.

I'm into my 6th week now and it hardly looks anything like it originally did when first landed here on Australian soil...
Fifty Years Afloat

We can't alter the direction of the wind,
But we can adjust our sails
mikes68
Mustang King
Mustang King
Posts: 3210
Joined: Wed Jul 28, 2010 8:47 pm
Contact:

Re: Mikes 68

Post by mikes68 »

I've been a little quiet on the updates here...

Although not "directly" related to the resto, I felt it was time to install a small sink in the garage. My wife was just a little more than raising and eyebrow at me each time I walked into the kitchen off the garage and started washing my hands in the kitchen sink:*

I found this little sink in the "pile" out the back of my Dad's garage so I mounted it next to the door into the kitchen - of course so that I would be more inclined to use it... :+

Image

I started cutting out the quarter skins as these are to be replaced anyway so I wanted them out of the way ready for when I go to the blast booth. Under advice (from the forum of course) I have left the leading 25mm edge of the skin on to help keep the 'B' pillar where it is until the doors go back on. At this stage I've also left the top and rear sections of the skin in place. I have some new skins coming in a few weeks however I don't think they have the recesses for the early model 68 reflectors so leaving them in here will give me good reference points if I need to graft them into the new skins whilst giving me plenty of access when blasting...

Image

I've also put in some door braces. These are not complete as yet with 1 or 2 vertical struts to be put in place - although I don't think it really needs it as the 1" RHS will provide plenty of rigidity...

Image

I am now in the process of building a rotisserie with the 2 main frames constructed. Today I picked up some steel pipe for the actual axis points so hopefully I will get into that this weekend. I've got some drawings and other specs from a few sources but am kinda also doing it on the fly. Still trying to decide whether or not I will have this a simple fixed height or maybe an adjustable height. If I can get some "lower priced" (that ones for your benefit Kerry :+) hydraulic rams then I will go the adjustable. Will post some pics of the rotisserie some time over the weekend if I remember...
Fifty Years Afloat

We can't alter the direction of the wind,
But we can adjust our sails
mikes68
Mustang King
Mustang King
Posts: 3210
Joined: Wed Jul 28, 2010 8:47 pm
Contact:

Re: Mikes 68

Post by mikes68 »

Got stuck into the floor pan today. At this stage I have really just cut around the edges (so to speak). I have also used a spot weld removal drill to cut the welds and a hammer and chisel to finish them off. The spot welds are not typically all that perfectly round or even so it is difficult to cut the whole weld away with one drill bit so it is usually fairly easily finished off with a good belt from a hammer and chisel. You just need to be a little careful that the underlying metal is strong enough to withstand the blow if it is to be retained / reused.

I still have to finish it off under the rockers and along the lower edge of the firewall as well as rip out some of the crappy, rusty sections next to / behind the rear torque boxes.

I will also be cutting out the lower reinforcement plates soon enough.

Here's a couple of shots of the bulk of the floor removed.

Image

Image

I also spent a bit of time forming up the axis for the rotisserie. I am going to put in a couple of braces at the top and bottom. I did a triple pass on the front and rear edges of the axis points to make sure there is ample strength and to be honest I could probably get away without putting in the reinforcement webs but I'm inclined to over-engineer these things a bit sometimes.

Image

Image
Fifty Years Afloat

We can't alter the direction of the wind,
But we can adjust our sails
mikes68
Mustang King
Mustang King
Posts: 3210
Joined: Wed Jul 28, 2010 8:47 pm
Contact:

Re: Mikes 68

Post by mikes68 »

Got stuck into the rest of the floor and lower reinforcement boxes today. Apart from a few dags under the inner rockers behind the rear torque boxes the entire floor is now out. I cleaned up all of the crap along the lower edge of the firewall and the front frame rails as can be seen in the image below...

Image

Oh, and just for you Kerry, to ensure I "engineered" this rotisserie "just right" I even added a grease nipple to each of the rollers and loaded them up... :w

Image
Fifty Years Afloat

We can't alter the direction of the wind,
But we can adjust our sails
mikes68
Mustang King
Mustang King
Posts: 3210
Joined: Wed Jul 28, 2010 8:47 pm
Contact:

Re: Mikes 68

Post by mikes68 »

I have just lined up a location for blasting and priming...

Recent pics in this thread obviously show the current state of the shell.

My plan now is to completely blast the shell (and other bits and pieces) and then put it into primer.

I will then obviously look at dealing with any other damage that may be uncovered on top of any of the already planned panel, rocker replacements etc...

I know the questions have been asked before and Lance has given me advice on various primers and the like but... just so that I don't go doing the wrong thing now, I would like to know if I should just use the one primer over the entire car or are there different paints (primers) that I should be getting for different areas of the car such as engine bay, underbody etc??

All help appreciated :(, all sarcasm, jokes digs and the like taken in the true spirit in which they are meant...:+
Fifty Years Afloat

We can't alter the direction of the wind,
But we can adjust our sails
Post Reply